Phase III:
Developing an Implementation Plan & Preparing the Environment
Description of Instructional Strategies & Methods:
Before beginning instruction for the 4th grade geometry focus, I will administer a pre-assessment provided by Montgomery County Public Schools as part of the 4th grade unit 1 math curriculum. The data from this pre-assessment will help me determine the areas of greatest focus, as well as provide a basis of how I will need to group my students for instruction.
Objective 1:
After working with the online resource “Lines, Line Segments, and Rays” (provided by IXL Math), students will be able to identify, draw, label, and describe points, lines, line segments, and rays with at least 90% accuracy.
Lesson 1: Lines, Rays, and Angles
|
Duration |
1 instructional period of 1 hour and 15 minutes |
|
Materials |
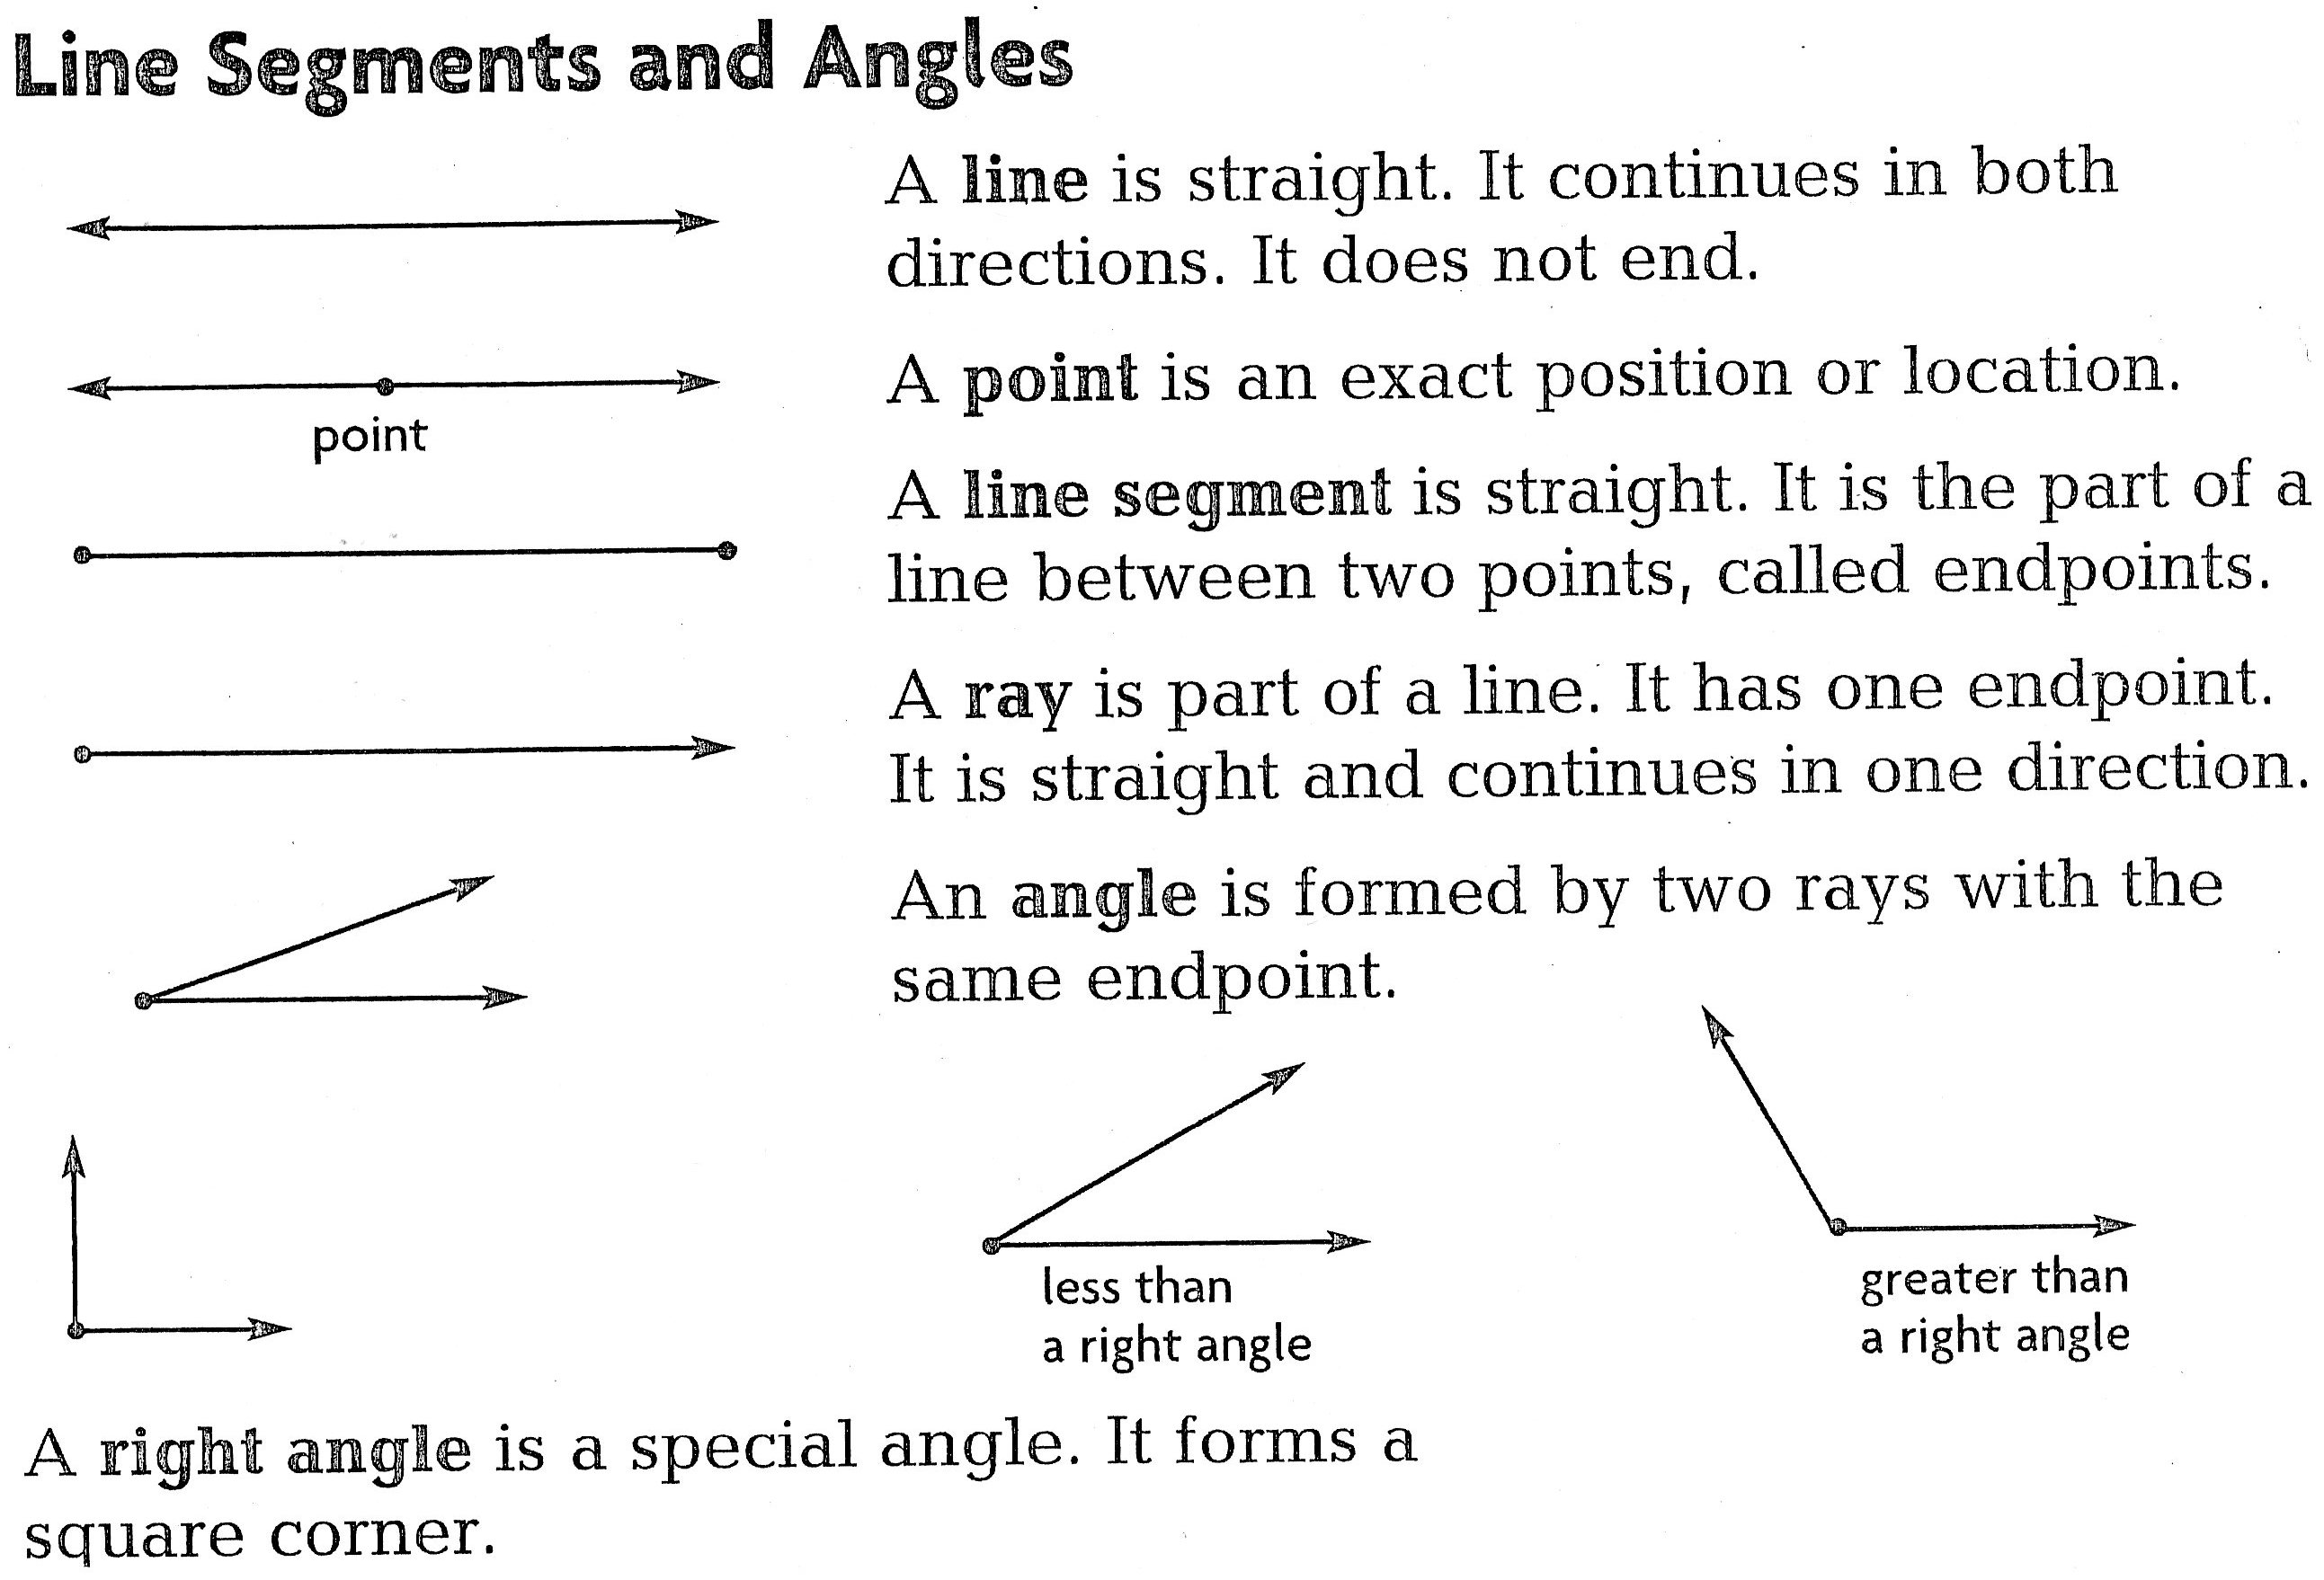
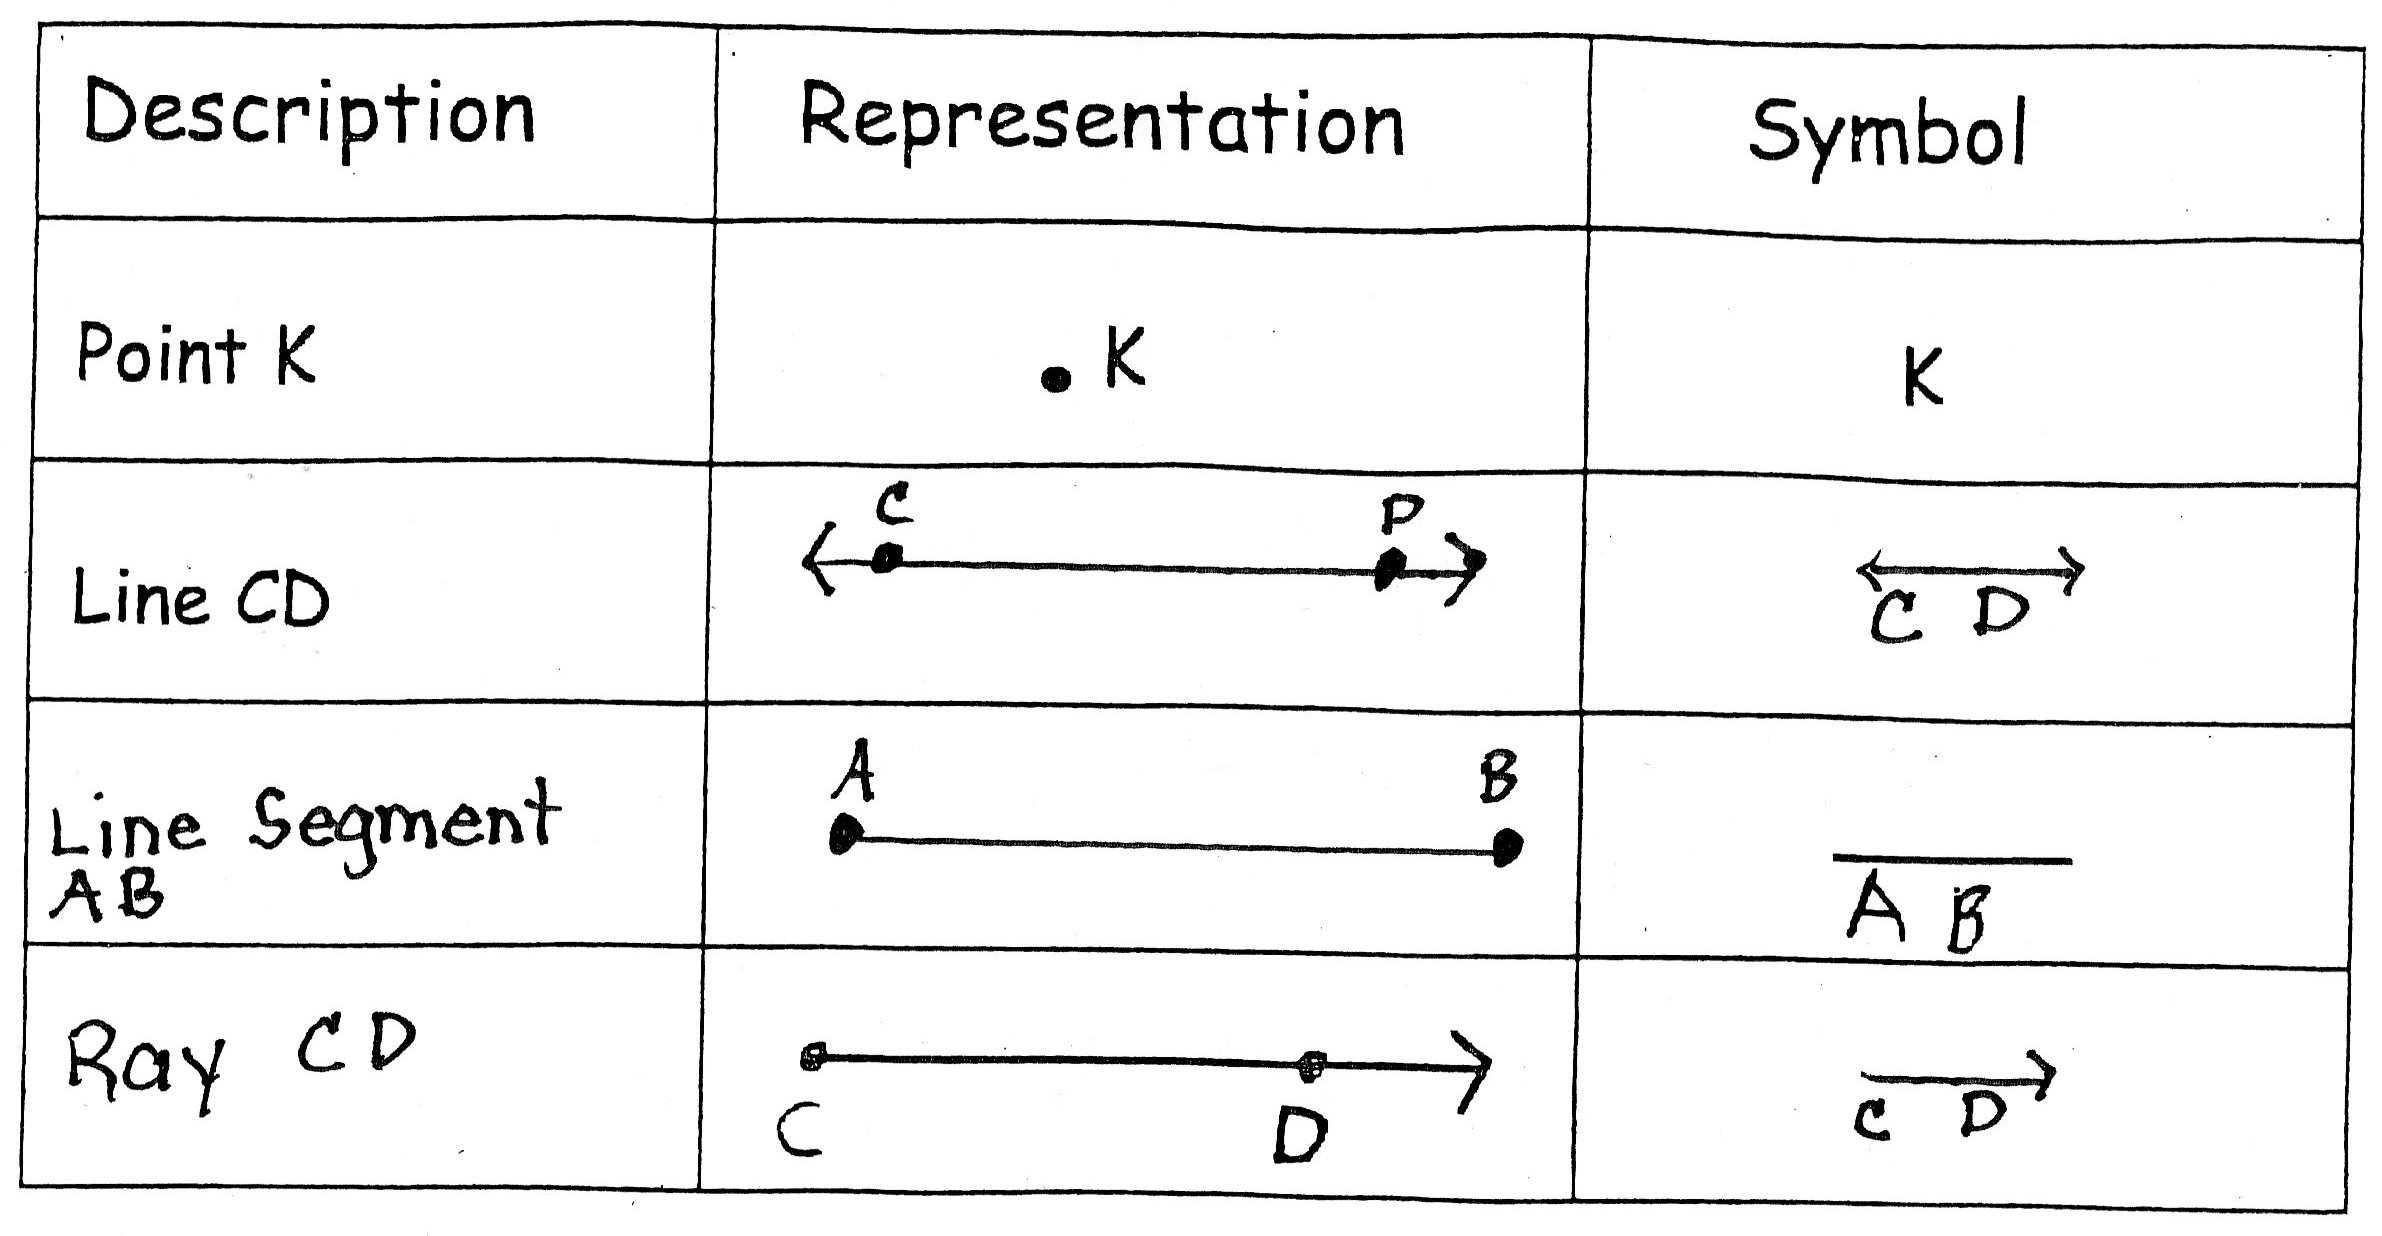
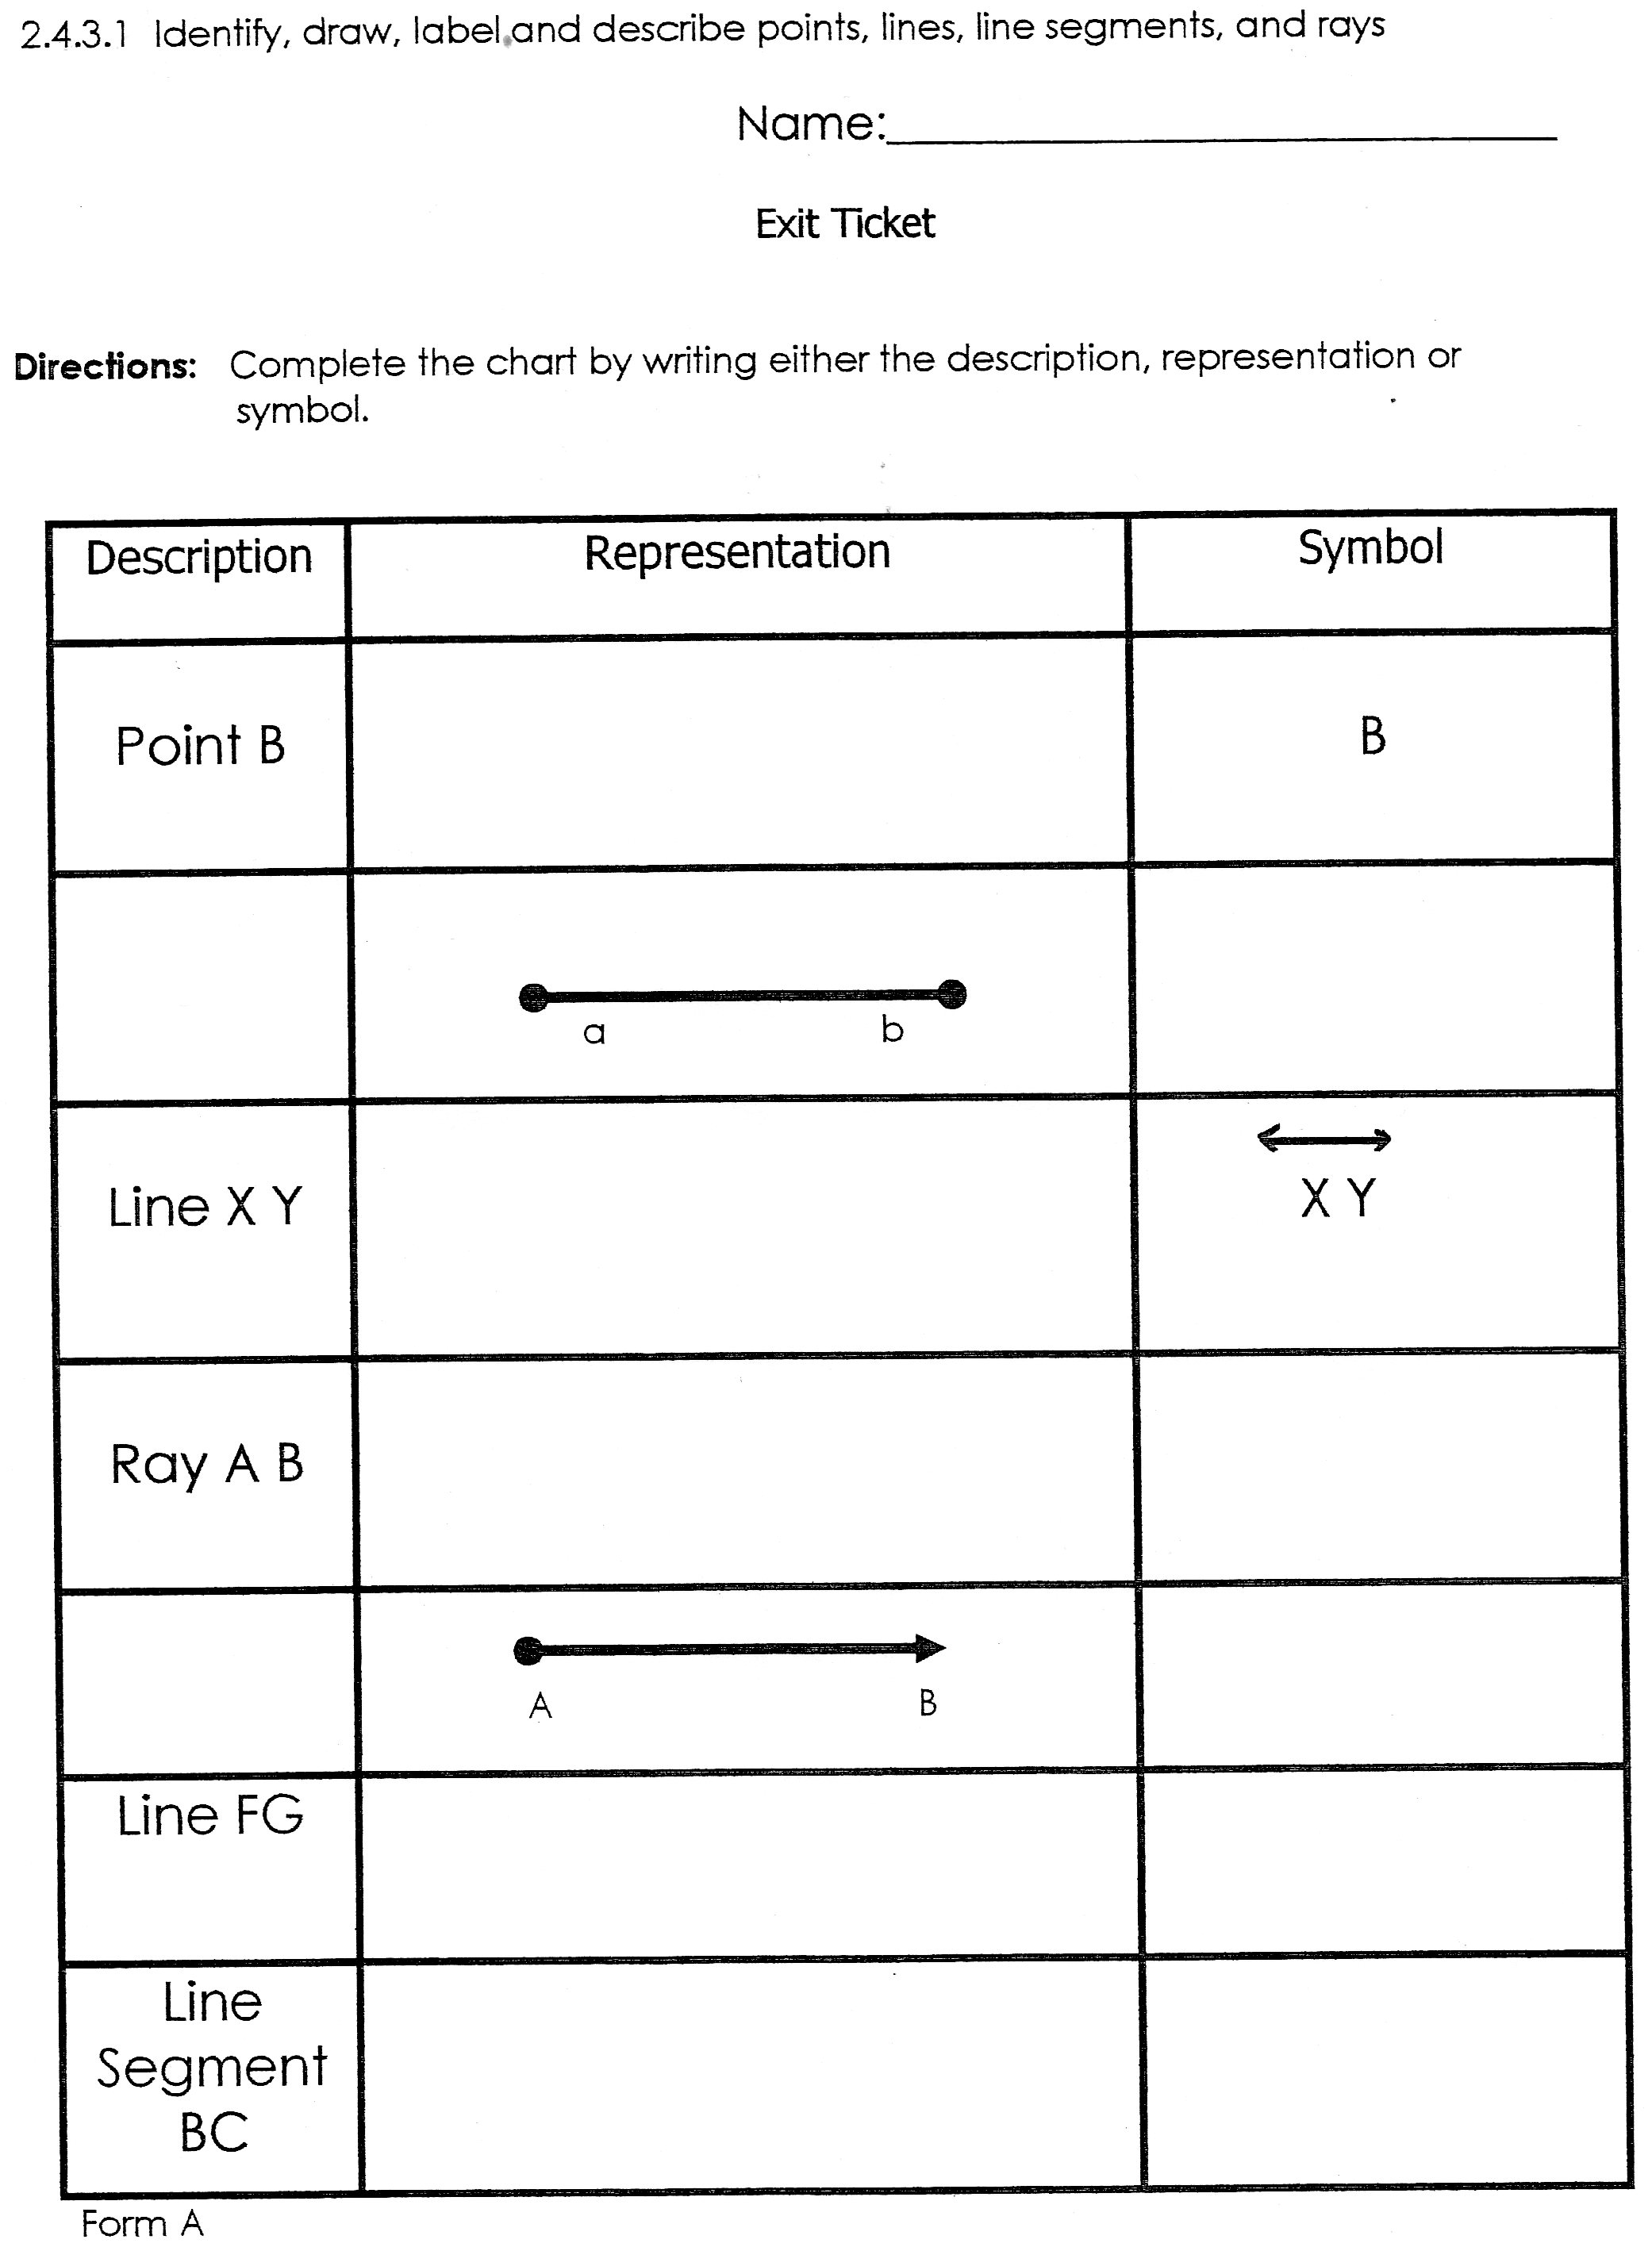
Promethean Board, ActivePen, “Lines, Rays, and Angles” flipchart, “Line Segments and Angles” resource sheet, “Symbols and Representations” resource sheet, class set (30) of mobile Netbook computers, www.ixl.com, Harcourt math textbooks (1 teacher edition, 18 student editions), “Symbols and Representations” exit card, “Lesson 17.1 Practice” worksheet |
|
Lesson Plan |
· The teacher will introduce the concept of geometry by talking (whole group) about a line. Questioning strategies will be used such as: “How would you describe a line?” and “What do you know about lines?” · The teacher will work through the first half of the “Lines, Rays, and Angles” flipchart with students (whole group), providing definitions and examples of lines, line segments, rays, angles, and points. During the discussion, the teacher will conduct a preliminary assessment of student understanding based on student responses to verbal questions. · Students will receive a copy of “Line Segments and Angles” resource sheet. · The teacher will continue working through the “Lines, Rays, and Angles” flipchart by discussing with the class (whole group) different symbols and representations for lines, line segments, rays, angles, and points. During the discussion, the teacher will conduct a preliminary assessment of student understanding based on student responses to verbal questions. · Students will receive a copy of “Symbols and Representations” resource sheet. · The teacher will distribute Netbook computers to each student and direct them to the IXL website (www.ixl.com). Students will navigate to Fourth Grade -> Geometry -> P. 26 Lines, Line Segments, and Rays. · Students will work through the activity “Lines, Line Segments, and Rays” independently while the teacher monitors the room. During this time, the teacher will pull small groups of students (about 6 students in each group) to work through sample problems (#5-22) on page 322 of Harcourt math textbooks. The teacher will provide individual instruction to clarify questions and deepen understanding. · Students will complete the “Symbols and Representations” exit card independently and turn in at the end of class. · Students will complete “Lesson 17.1 Practice” worksheet (from Harcourt math) for homework. |

|
Line Segments and Angles Resource Sheet.jpg Size : 444.405 Kb Type : jpg |
|
|
Symbols and Representations Resource Sheet.jpg Size : 245.392 Kb Type : jpg |
|
|
Symbols and Representations Exit Card.jpg Size : 388.253 Kb Type : jpg |
|
|
Lesson 17.1 Practice Worksheet.jpg Size : 478.716 Kb Type : jpg |
Objective 2:
After working with the online resource “Parallel, Perpendicular, and Intersecting” (provided by IXL Math), students will be able to identify, draw, label, and describe linear relationships (parallel, perpendicular, & intersecting) with at least 90% accuracy.
Lesson 2: Line Relationships
|
Duration |
1 instructional period of 1 hour and 15 minutes |
|
Materials |
Promethean Board, ActivePen, “Line Relationships” flipchart, “Symbols and Representations” warm-up, “Lesson 23.1 Line Relationships” worksheet, class set (30) of mobile Netbook computers, www.ixl.com, “More Line Segments, Rays, and Lines” worksheet, “Lesson 17.2 Practice” worksheet |
|
Lesson Plan |
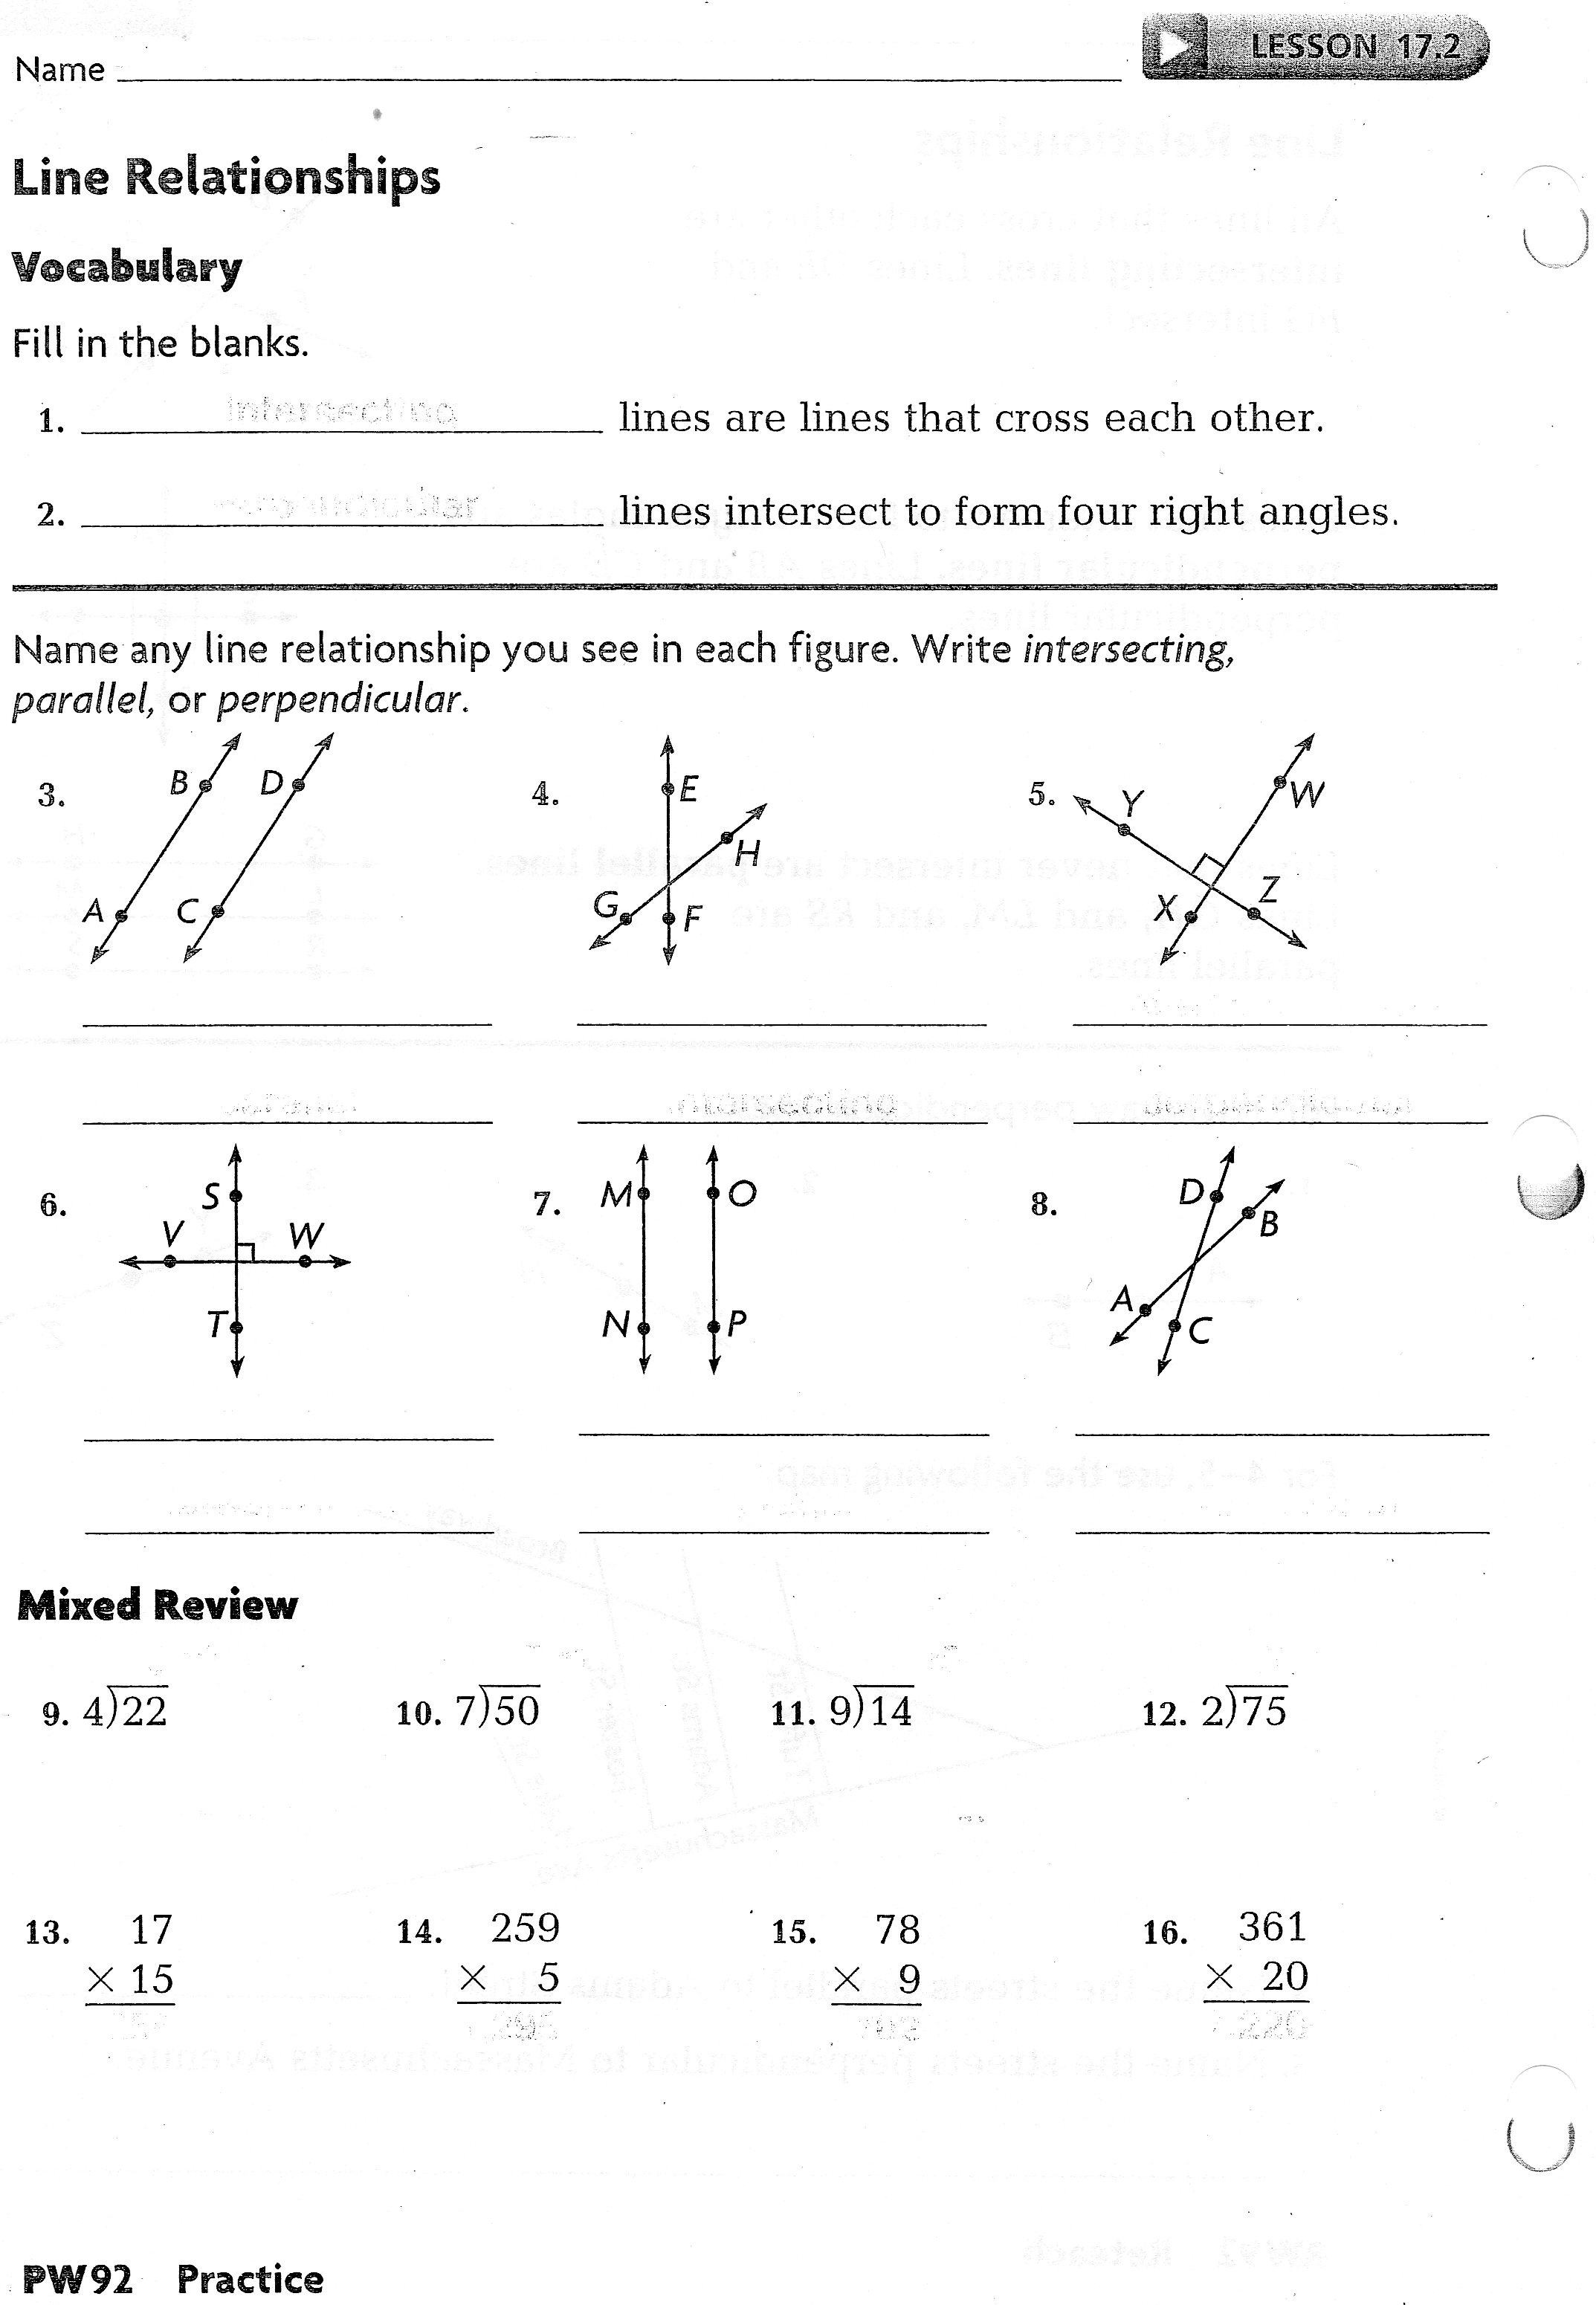
· The teacher will review the concepts learned during the lesson on lines, rays, and angles by completing the “Symbols and Representations” warm-up. · The teacher will introduce the concept of line relationships by defining the word “relationship.” Questioning strategies will be used such as: “If we know what a relationship is, what does that mean for lines?” and “Do you have any ideas as to what a line relationship might be?” · The teacher will work through the “Line Relationships” flipchart with students (whole group), providing definitions and examples of parallel, intersecting, and perpendicular lines. During the discussion, the teacher will conduct a preliminary assessment of student understanding based on student responses to verbal questions. · Students will receive a copy of “Lesson 23.1 Line Relationships” worksheet. The teacher will lead students (whole group) as they complete the worksheet together. · The teacher will distribute Netbook computers to each student and direct them to the IXL website (www.ixl.com). Students will navigate to Fourth Grade -> Geometry -> P. 27 Parallel, Perpendicular, and Intersecting. · Students will work through the activity “Parallel, Perpendicular, and Intersecting” independently while the teacher monitors the room. During this time, the teacher will pull small groups of students (groups will be formed based on student performance on “Symbols and Representations” exit card from previous lesson) to work through the “More Line Segments, Rays, and Lines” worksheet. The teacher will provide individual instruction to clarify questions and deepen understanding. · Students will complete “Lesson 17.2 Practice” worksheet (from Harcourt math) for homework. |
|
|
Symbols and Representations Warm-up.jpg Size : 581.853 Kb Type : jpg |
|
|
Lesson 23.1 Line Relationships Worksheet.jpg Size : 560.091 Kb Type : jpg |
|
|
More Line Segments, Rays, and Lines Worksheet.jpg Size : 851.756 Kb Type : jpg |
|
|
Lesson 17.2 Practice Worksheet.jpg Size : 455.975 Kb Type : jpg |
** Following Lesson 2: Line Relationships, students will take the “Lines and Linear Relationships” quiz to assess understanding of the first two lessons. In the interest of time, students will be placed in small groups based on their scores for continued instruction on lines, line segments, rays, points, and linear relationships.

|
Lines and Linear Relationship Quiz.pdf Size : 50.198 Kb Type : pdf |
Objective 3:
After working with the online resources “Acute, Right, Obtuse, and Straight Angles” & “Measure Angles with a Protractor” (provided by IXL Math), students will be able to identify, classify, and sketch acute, right, obtuse, and straight angles, and relate them to real-world examples with at least 90% accuracy.
Lesson 3: Measuring Angles
|
Duration |
1 instructional period of 1 hour and 15 minutes |
|
Materials |
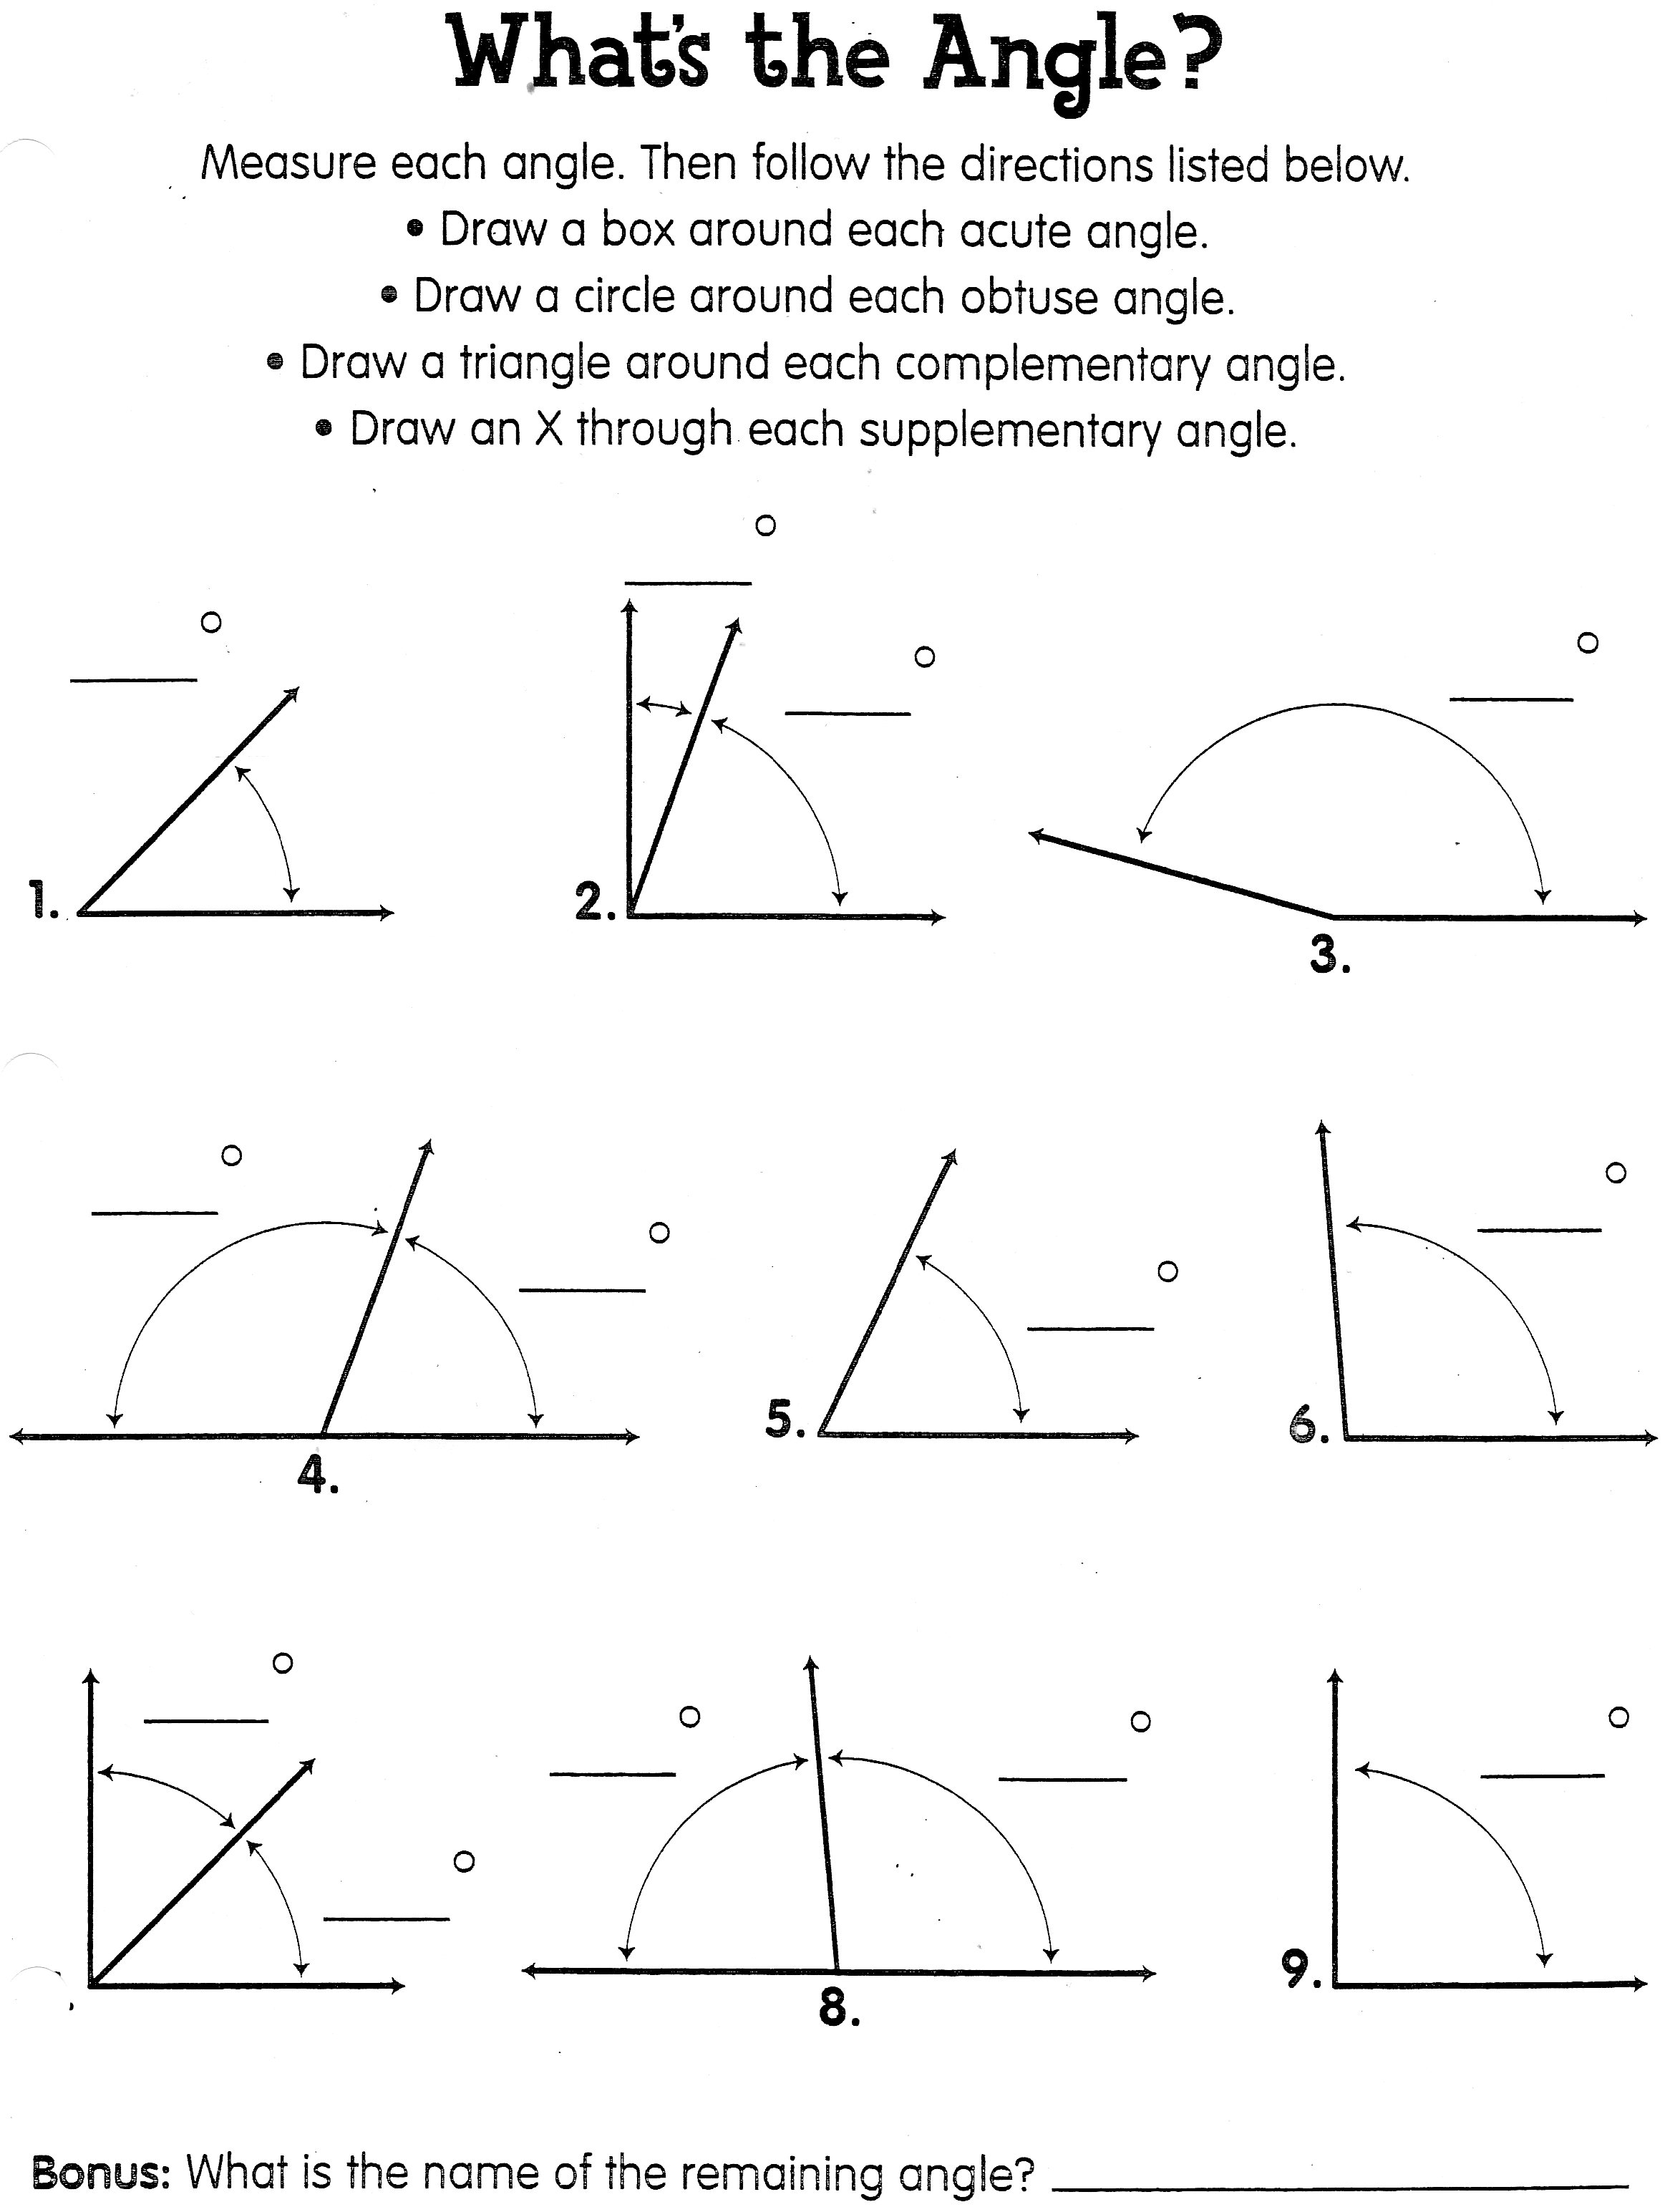
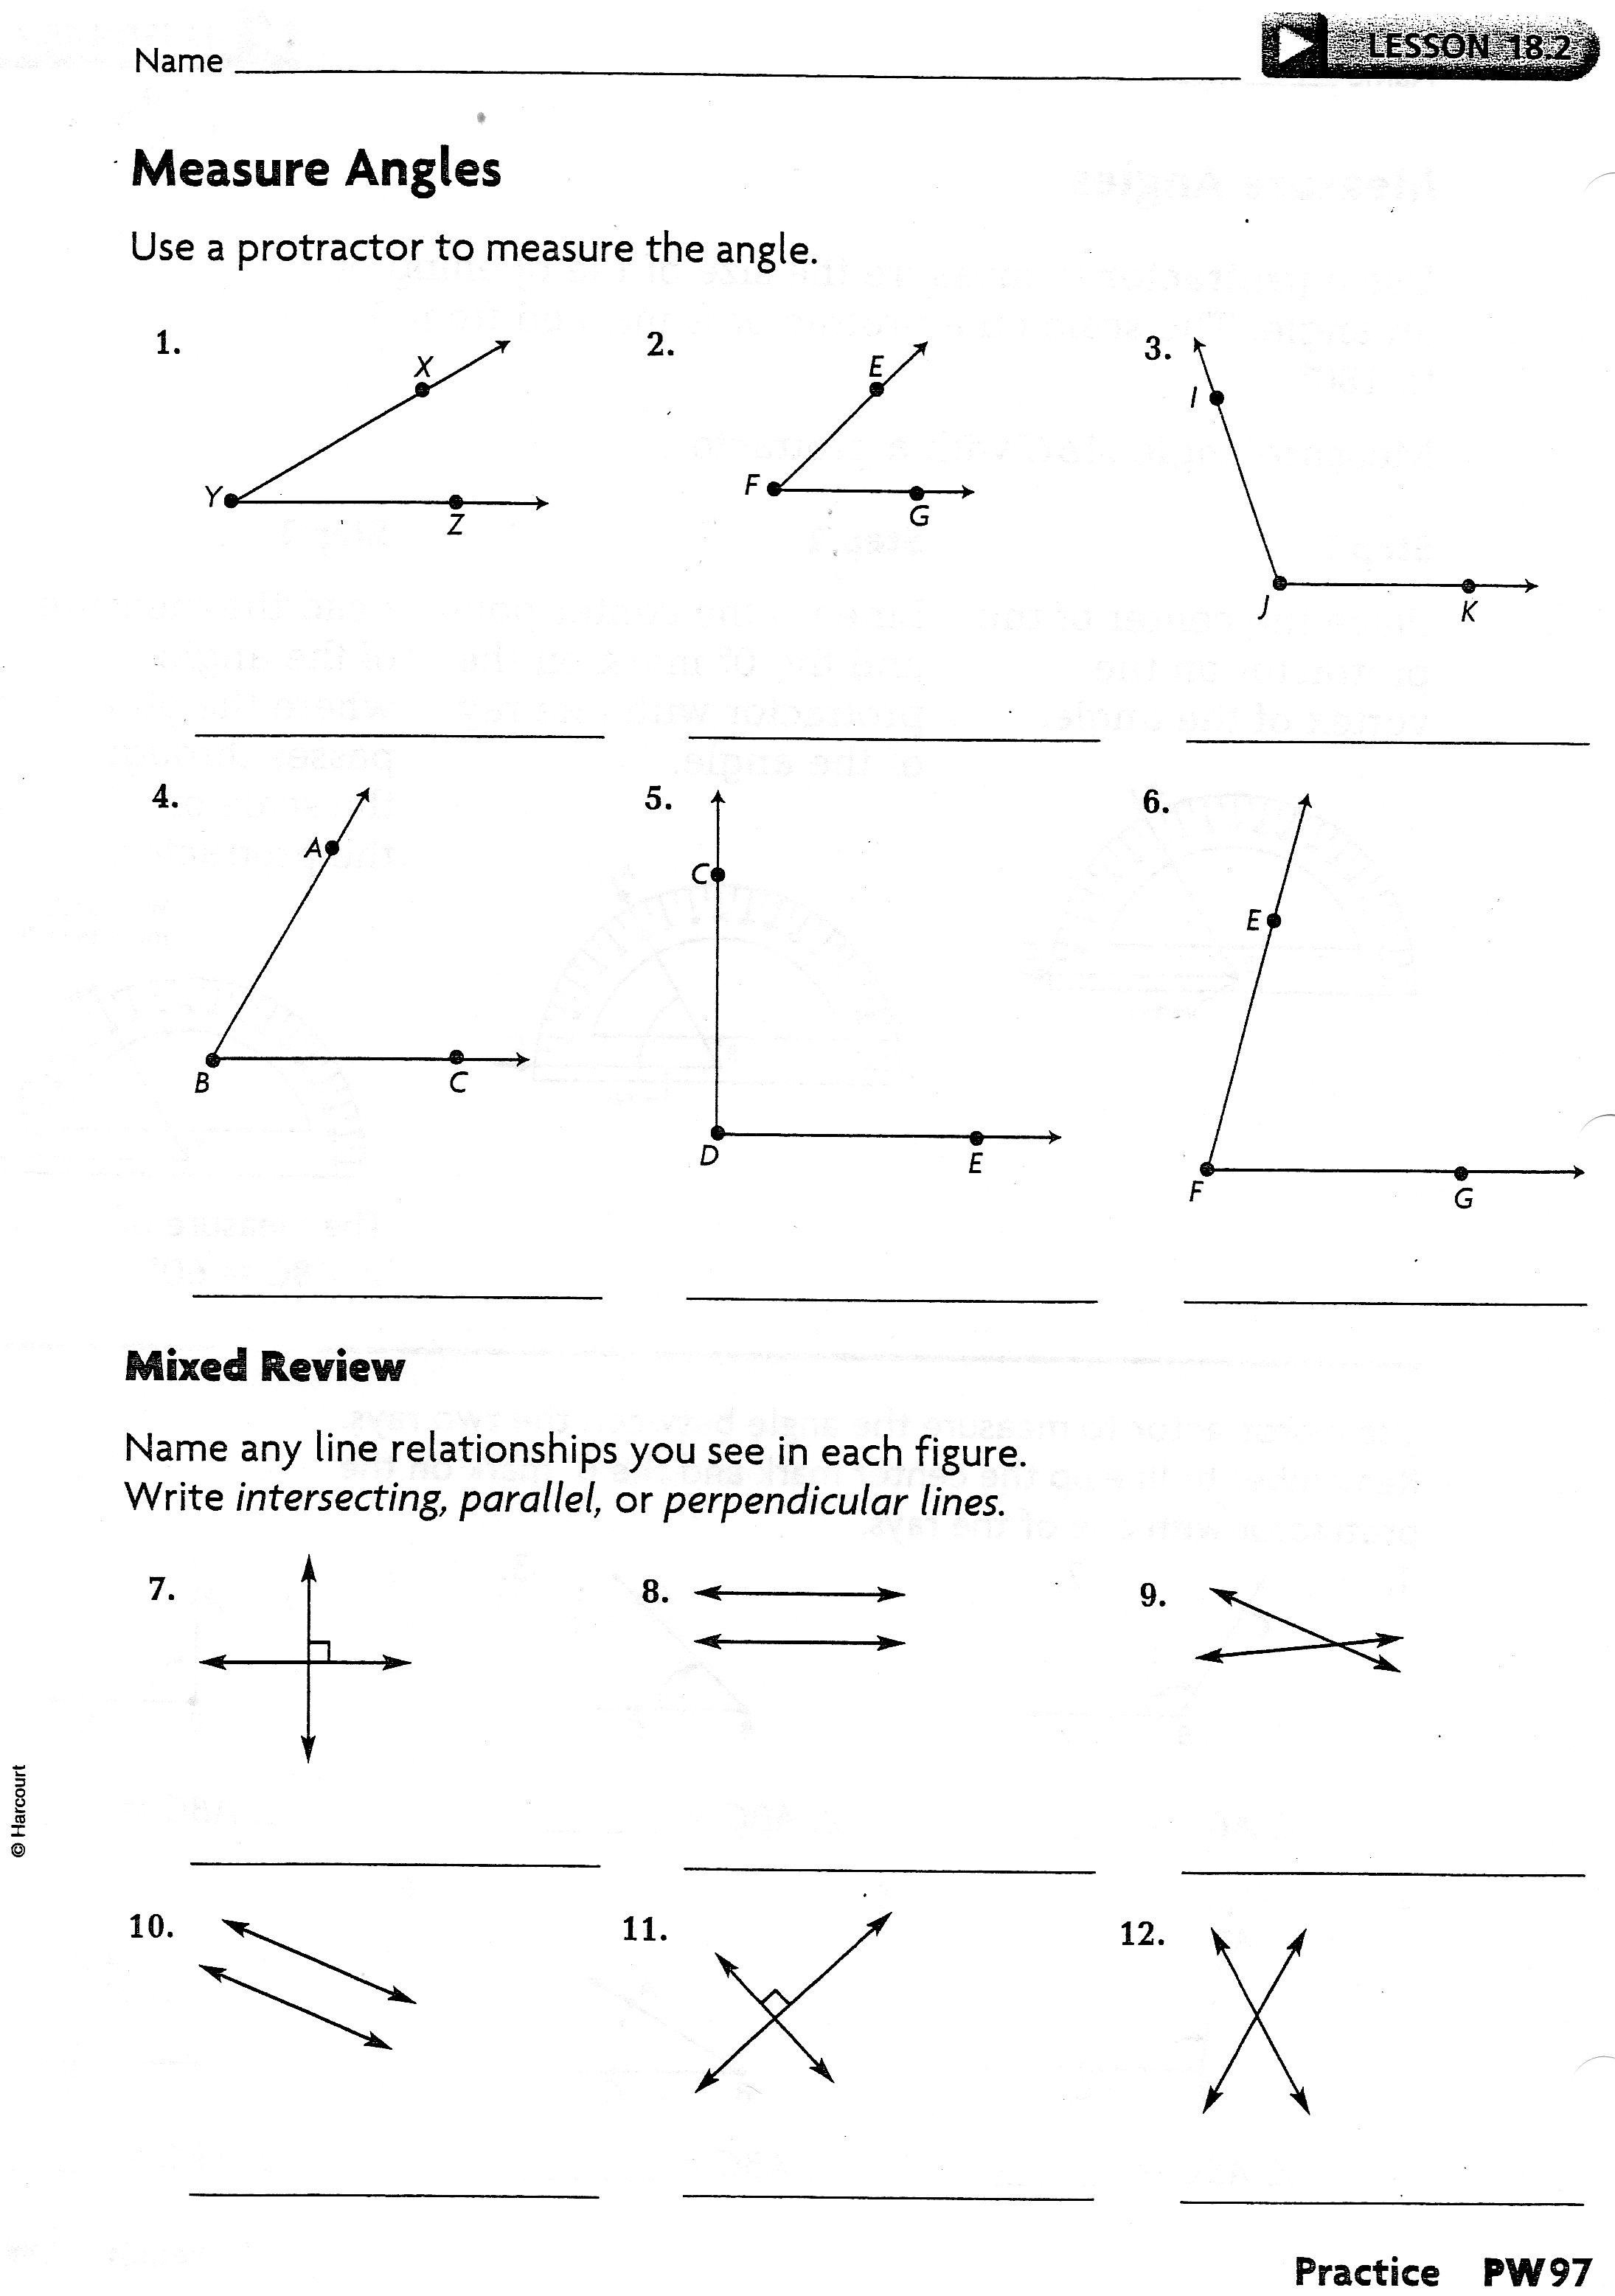
Promethean Board, ActivePen, “Measuring Angles” flipchart, “Acrobatic Angles” worksheet, 19 protractors, “What’s the Angle?” Worksheet, “Lesson 18.2 Reteach” worksheet, “Lesson 18.2 Practice” worksheet |
|
Lesson Plan |
· The teacher will introduce the concept of angles by discussing how angles are named and represented (from lesson 1). · The teacher will work through the first half of the “Measuring Angles” flipchart with students (whole group), providing definitions and examples of acute, obtuse, and right angles. This is a concept that students were first introduced to during 3rd grade, so the teacher will conduct a preliminary assessment of student understanding based on student responses to verbal questions before moving on to measuring angles. · The teacher will use her body to demonstrate lines, line segments, rays, and points and explain that body movements can be used to represent the different types of angles. Students will receive a copy of “Acrobatic Angles” worksheet to reinforce their knowledge of acute, obtuse, and right angles. · When the teacher determines that student understanding is strong enough, she will continue through the second half of the flipchart and discuss the tools required (protractor) and how to use them to measure angles. · After explaining and modeling the steps to measuring angles, students will receive a copy of the “What’s the Angle?” worksheet. The teacher will lead students (whole group) as they complete the worksheet together. · Students will receive a copy of the “Lesson 18.2 Reteach” (from Harcourt math) worksheet. Students will work with partners to complete the worksheet while the teacher monitors the room. The teacher will monitor discussions and work with small groups of students to increase understanding. · Students will complete the “Lesson 18.2 Practice” worksheet (from Harcourt math) for homework. |
Lesson 4: Measuring Angles Continued
|
Duration |
1 instructional period of 1 hour and 15 minutes |
|
Materials |
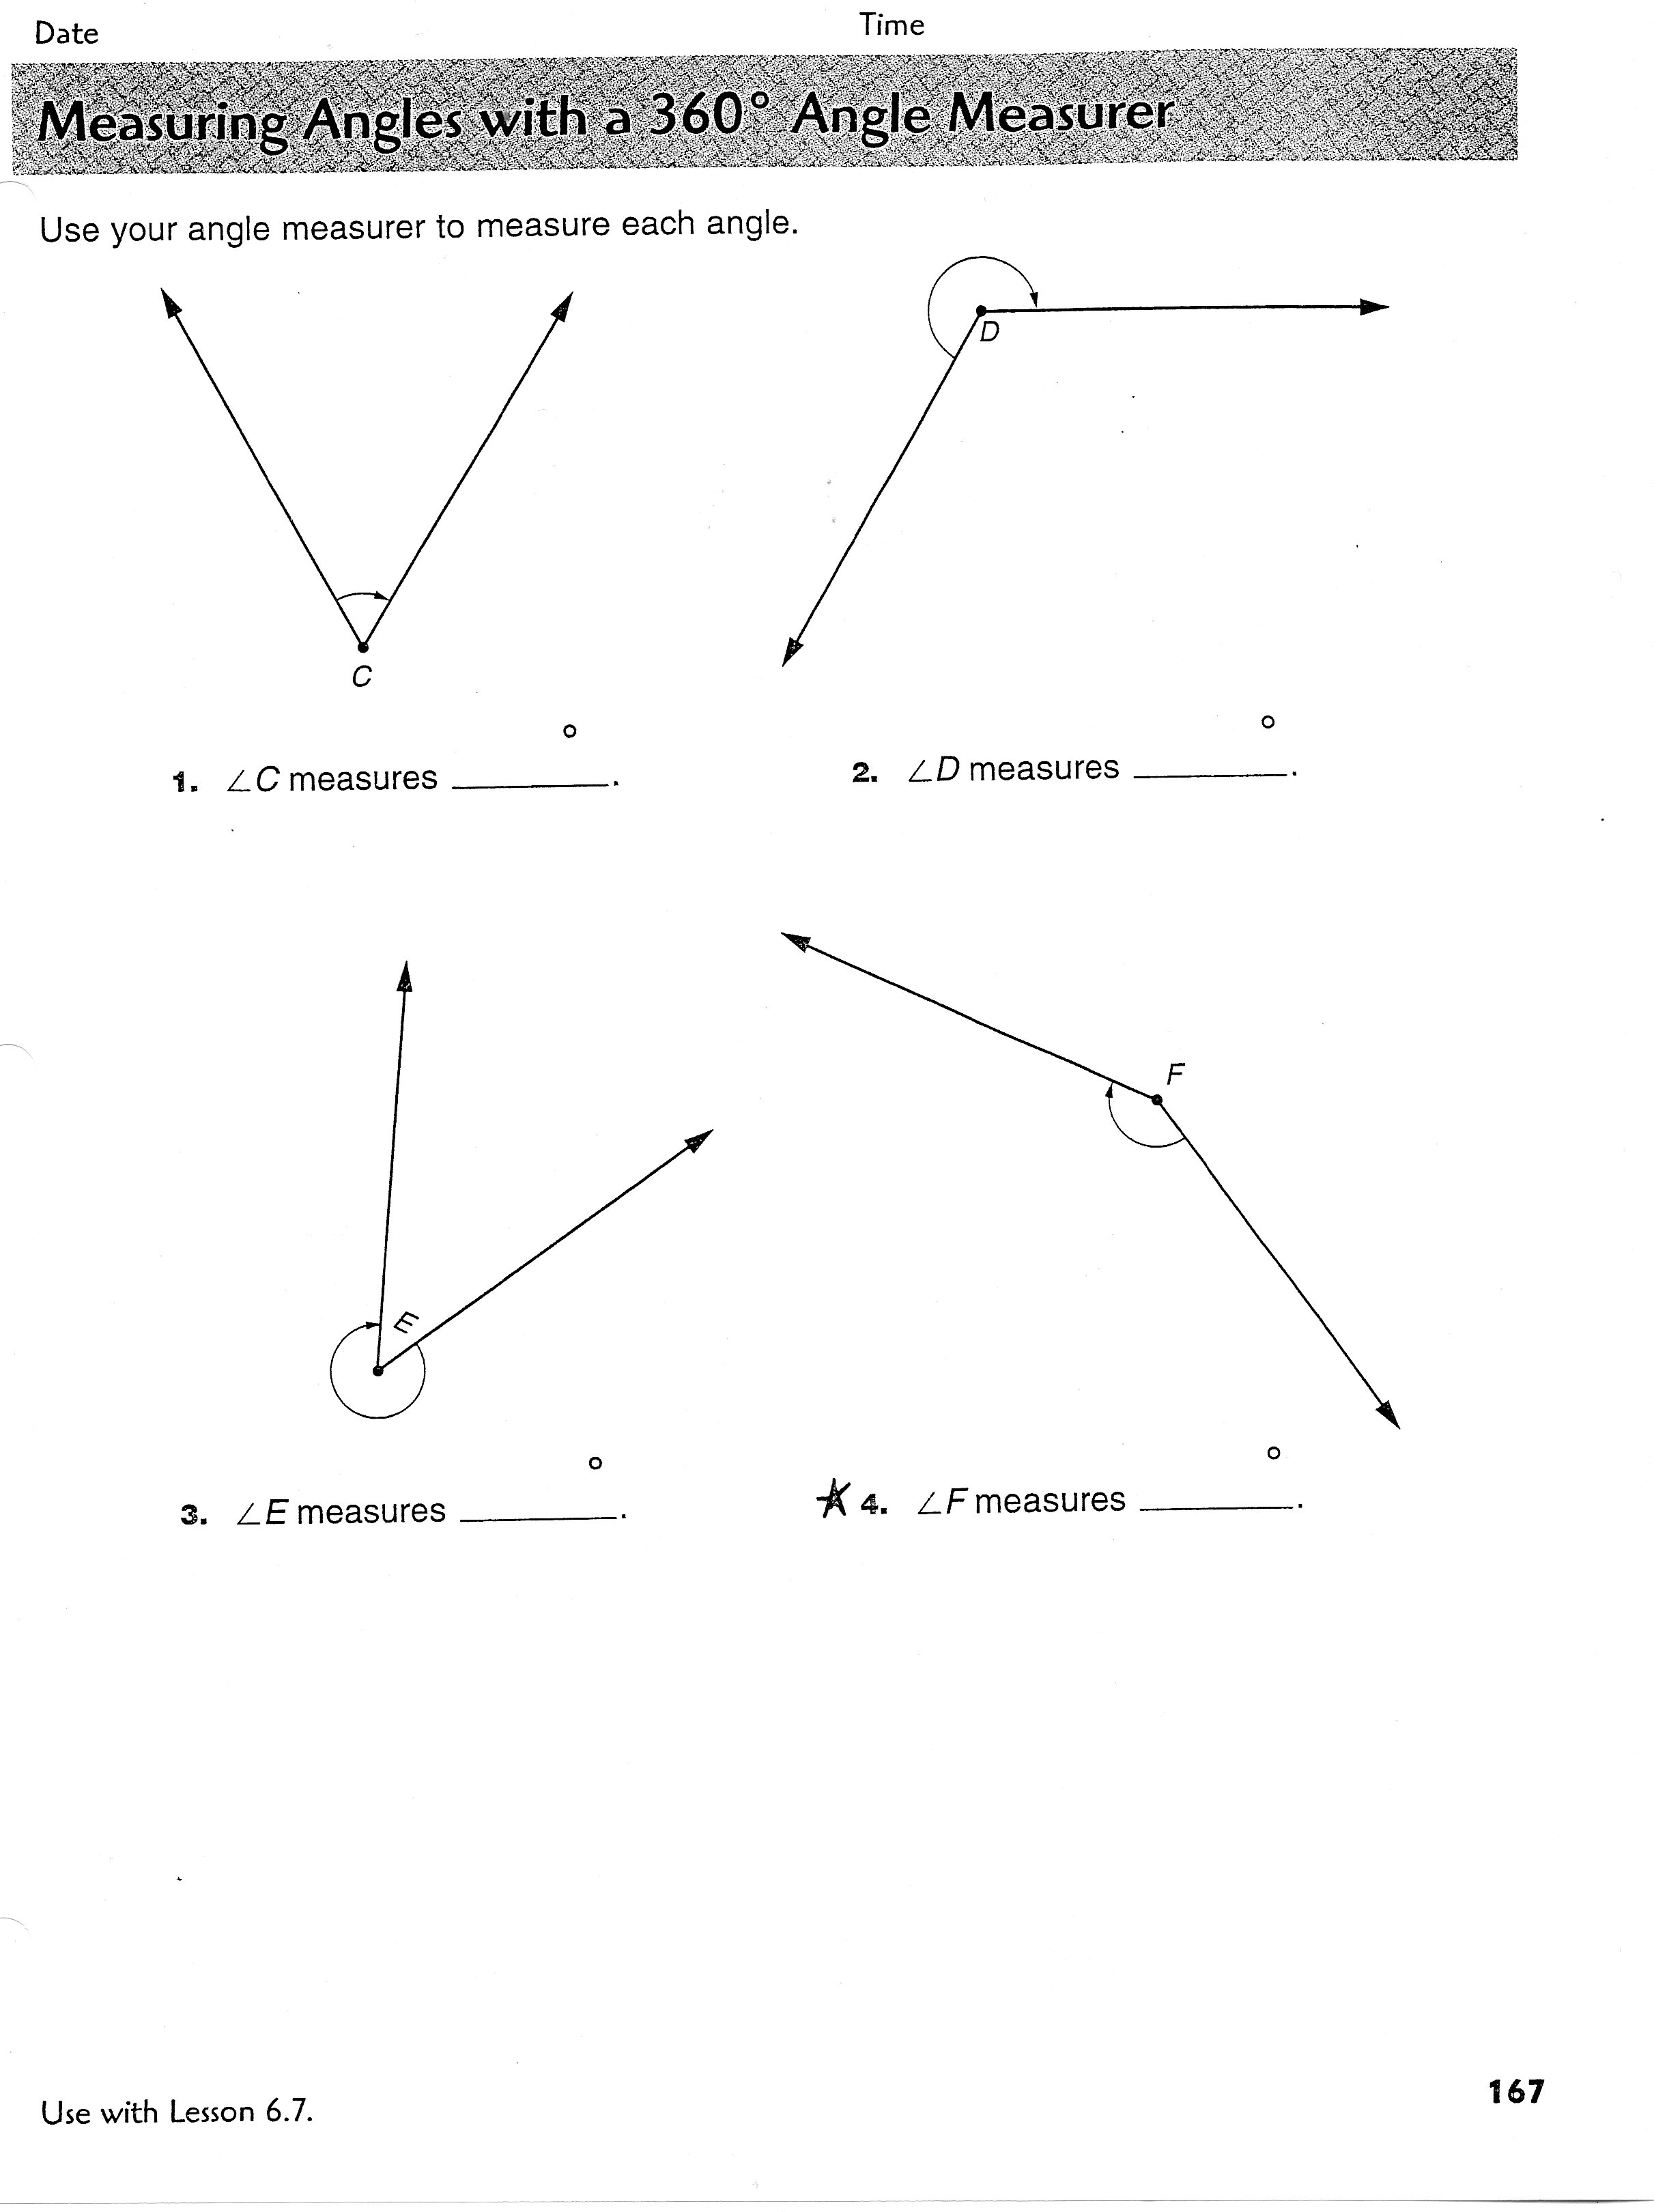
Promethean Board, ActivePen, www.ixl.com, “Angles in the Real World” Worksheet, “Measuring Angles with a 360° Measurer” Worksheet, “Measuring Angles with a Protractor” Worksheet |
|
Lesson Plan |
· The teacher will re-introduce the topic of angles by discussing the main points from the previous lesson. Questioning strategies will be used such as: “Can anyone remind me what the three different types of angles are” and “What kind of tool do we need to use to measure angles?” · As a warm-up activity, students will complete the “Angles in the Real World” worksheet to review the different types of angles. · Students will take out the “Lesson 18.2 Practice” worksheet and the teacher will lead the class (whole group) in checking their work. · The teacher will distribute Netbook computers to each student and direct them to the IXL website (www.ixl.com). Students will navigate to Fourth Grade -> Geometry -> Based on their understanding, students will either work on P. 11 Acute, Right, Obtuse, and Straight Angles or P. 13 Measure Angles with a Protractor. · Students will work through their activity independently while the teacher monitors the room. During this time, the teacher will pull small groups of students (about 6 students in a group) to work through the “Measuring Angles with a 360° Angle Measurer” worksheet. The teacher will provide individual instruction to clarify questions and deepen understanding. · Students will complete “Measuring Angles with a Protractor” worksheet for homework. |
|
|
Acrobatic Angles Worksheet.jpg Size : 662.473 Kb Type : jpg |
|
|
What's the Angle Worksheet.jpg Size : 420.283 Kb Type : jpg |
|
|
Lesson 18.2 Reteach Worksheet.jpg Size : 560.324 Kb Type : jpg |
|
|
Lesson 18.2 Practice Worksheet.jpg Size : 349.192 Kb Type : jpg |
|
|
Angles in the Real World.pdf Size : 22.579 Kb Type : pdf |
|
|
Measuring Angles with a 360 Degree Angle Measurer Worksheet.jpg Size : 452.758 Kb Type : jpg |
|
|
Measuring Angles with a Protractor Worksheet.jpg Size : 295.044 Kb Type : jpg |
Objective 4:
After working with the online resources “Identify Planar and Solid Figures”, “Which 2-Dimensional Shape is being Described?”, and “Which 3-Dimensional Shape is Being Described?” (provided by IXL Math), students will be able to identify and describe the attributes of solid figures with at least 90% accuracy.
Lesson 5: Classifying Quadrilaterals & Polygons
|
Duration |
1 instructional period of 1 hour and 15 minutes |
|
Materials |
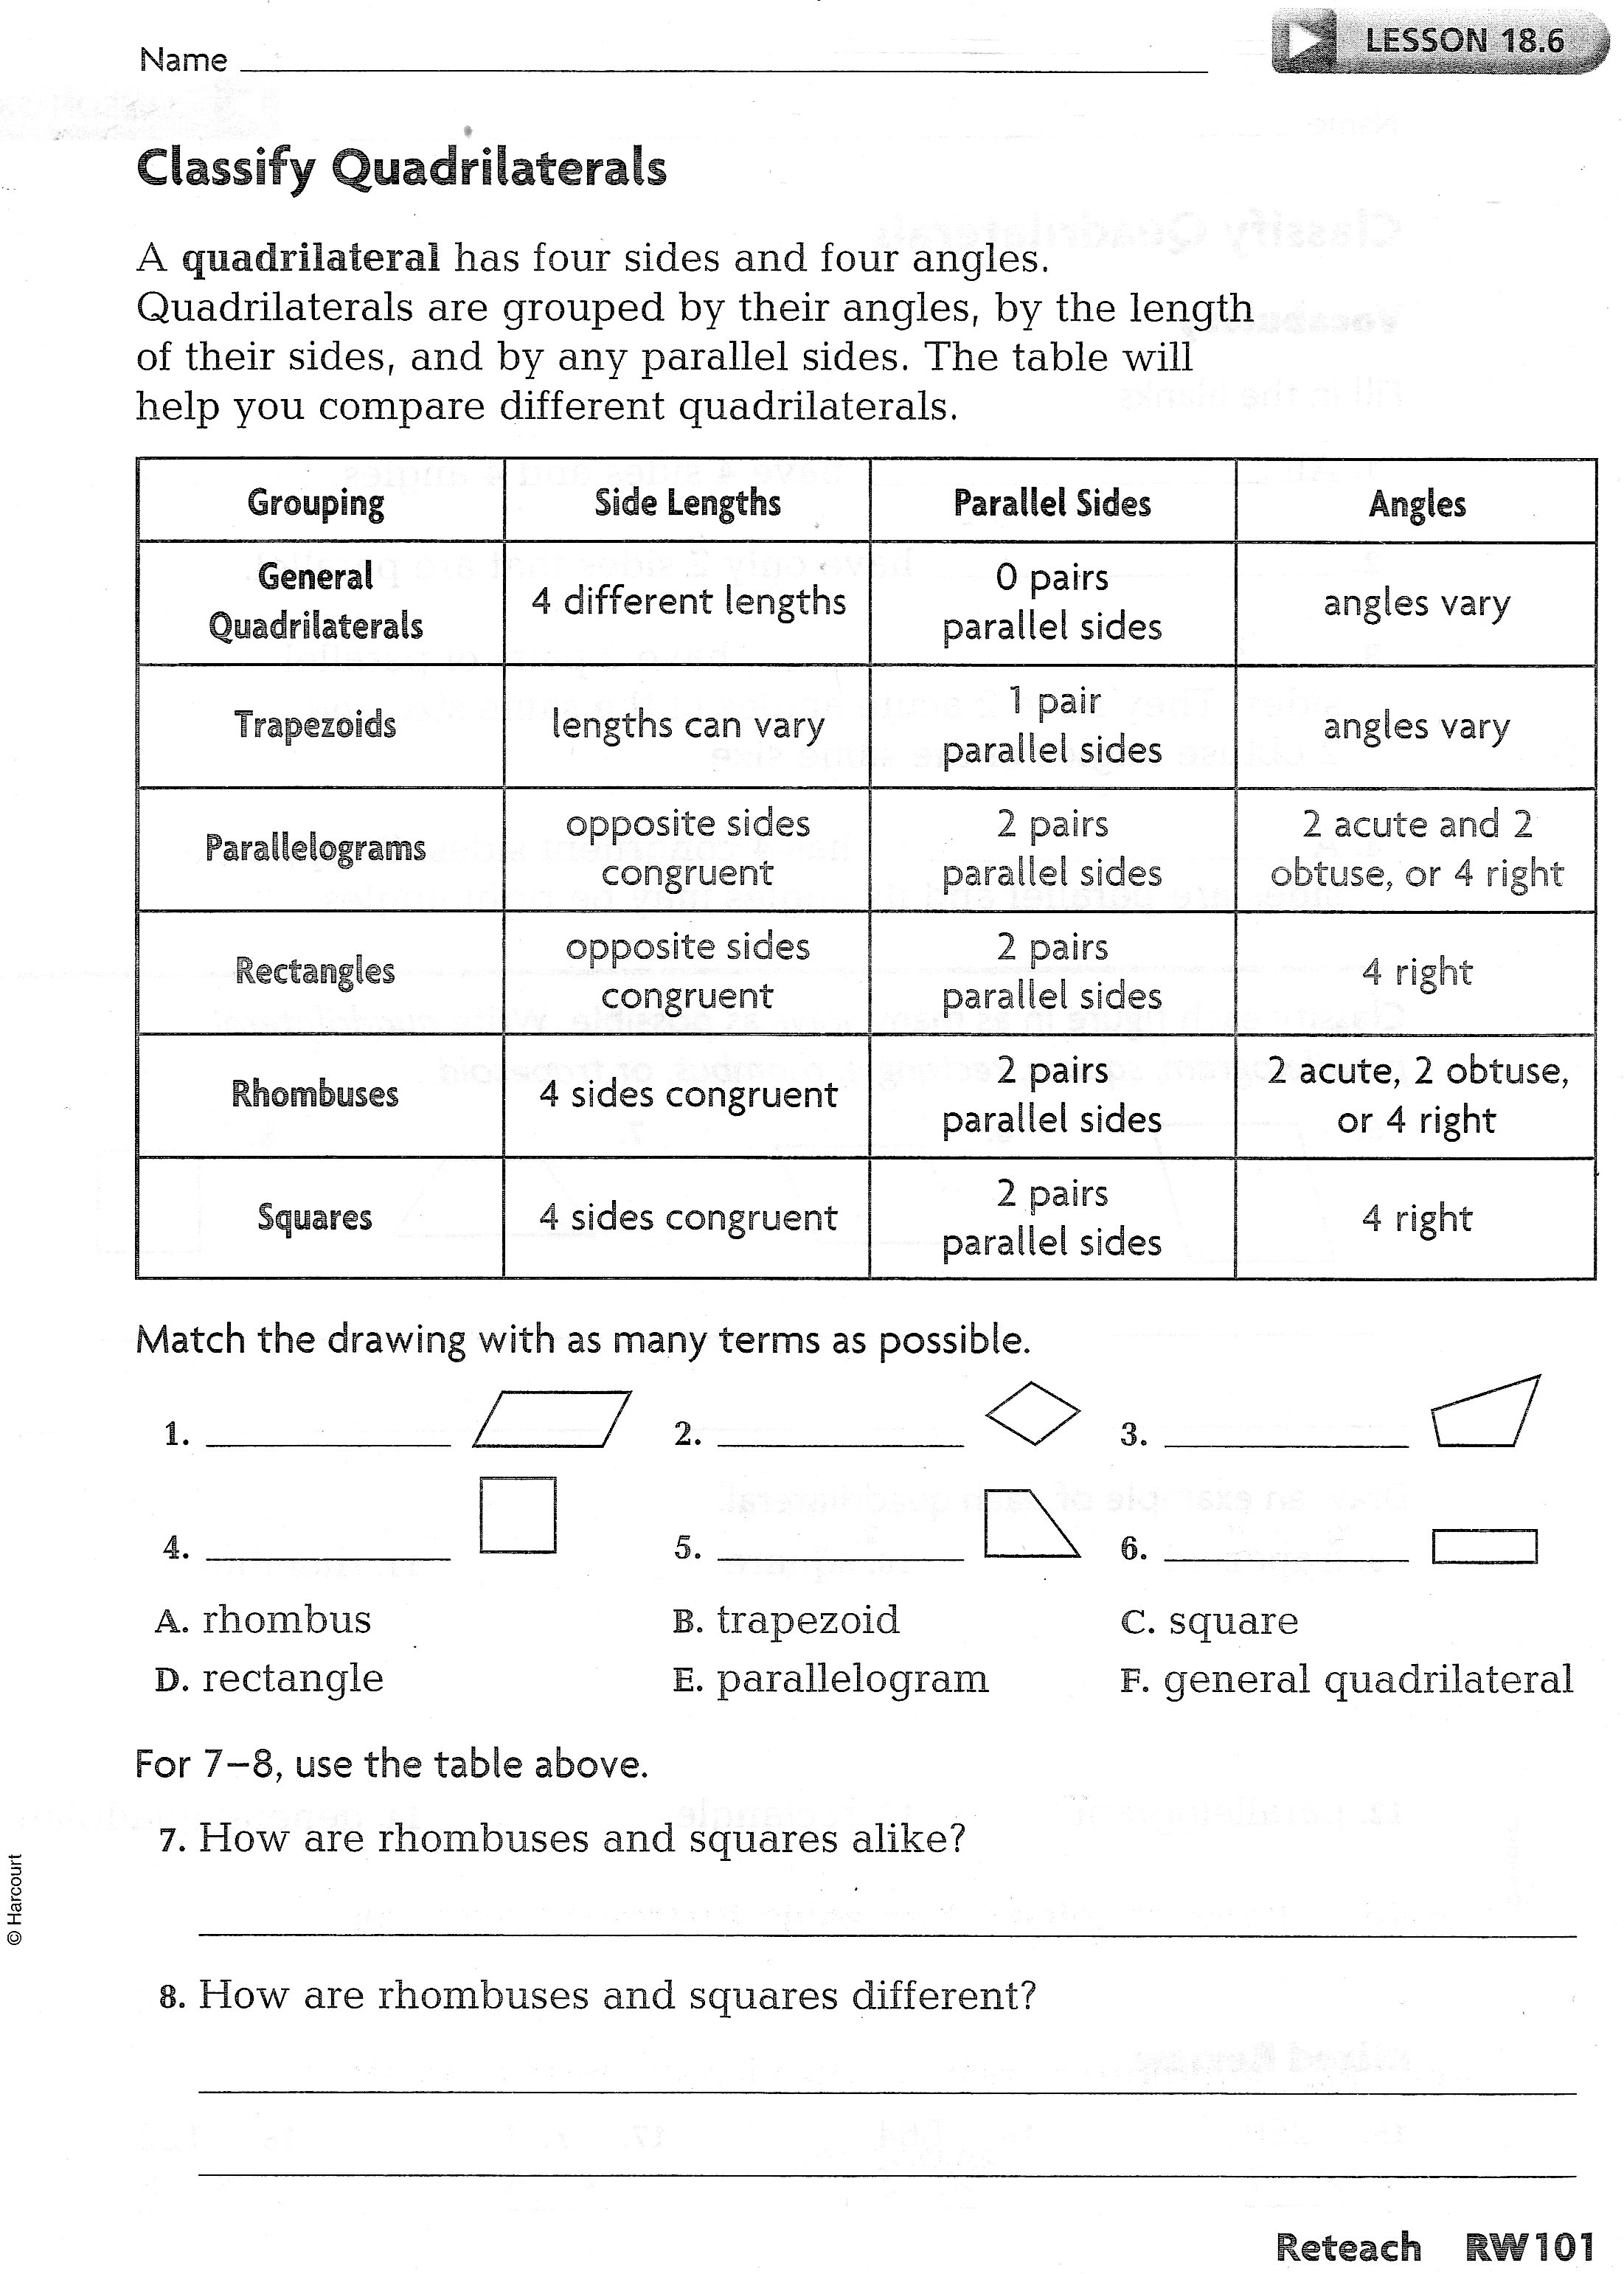
Promethean Board, ActivePen, “Classifying Quadrilaterals and Polygons” Flipchart , “Lesson 13.4 Polygons” Worksheet, “Lesson 18.6 Reteach” worksheet |
|
Lesson Plan |
· The teacher will introduce the vocabulary words “quadrilateral” and “polygon.” Questioning strategies will be used such as: “What do you know about polygons?” and “What smaller words do you hear in quadrilateral?” · The teacher will work through the “Classifying Quadrilaterals and Polygons” flipchart by discussing the differences and rules for each classification. · The teacher will work with students to break down the names of each polygon to determine the traits for each (i.e. – triangle = tri or three; quadrilateral = quad or four; etc.). · Students will work with partners to complete the “Lesson 13.4 Polygons” worksheet and identify different types of polygons based on their characteristics while the teacher monitors the room. The teacher will monitor discussions and work with small groups of students to increase understanding. · Students will be instructed to clear their desks and the teacher will pass out Geoboards and rubber bands. The teacher will list attributes of different polygons and quadrilaterals on the Promethean Board and students will use what they know about these geometric figures to create the shapes on their boards. · The teacher will takes notes on how students complete this activity for use in determining small groups for the next lesson. · Students will complete the “Lesson 18.6 Reteach” worksheet for homework. |
Lesson 6: Classifying 3-Dimensional Shapes
|
Duration |
1 instructional period of 1 hour and 15 minutes |
|
Materials |
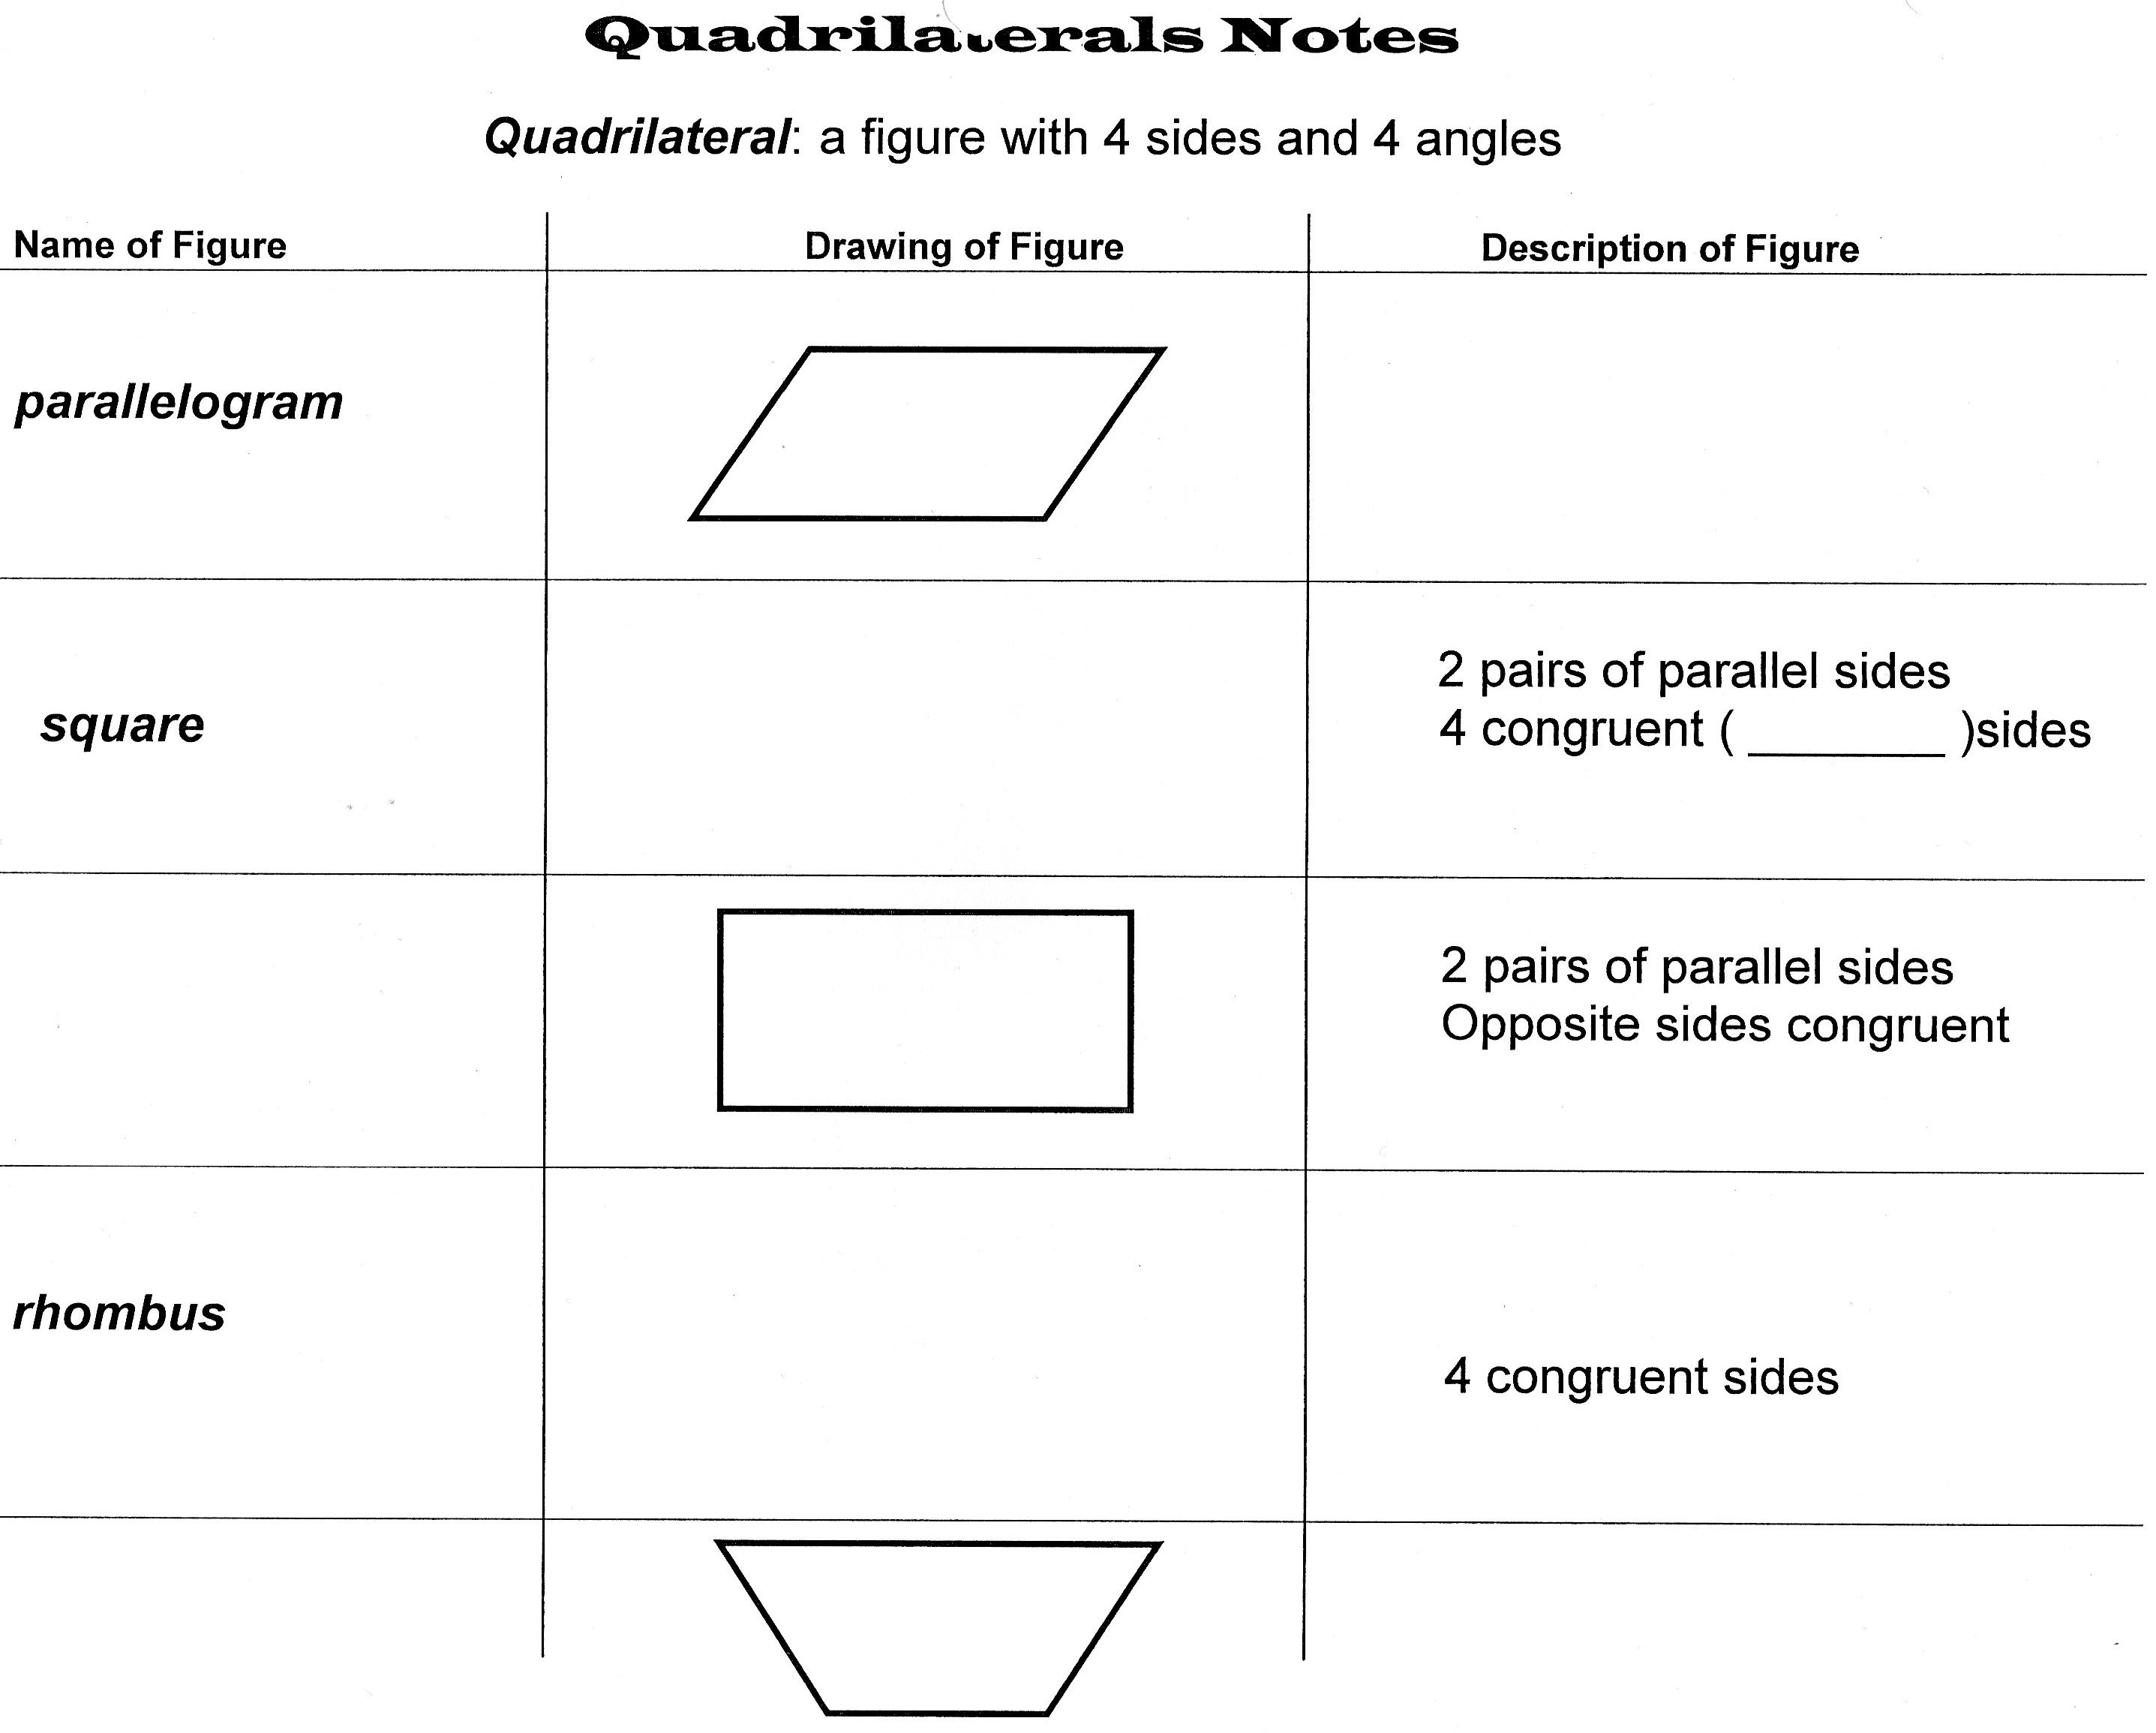
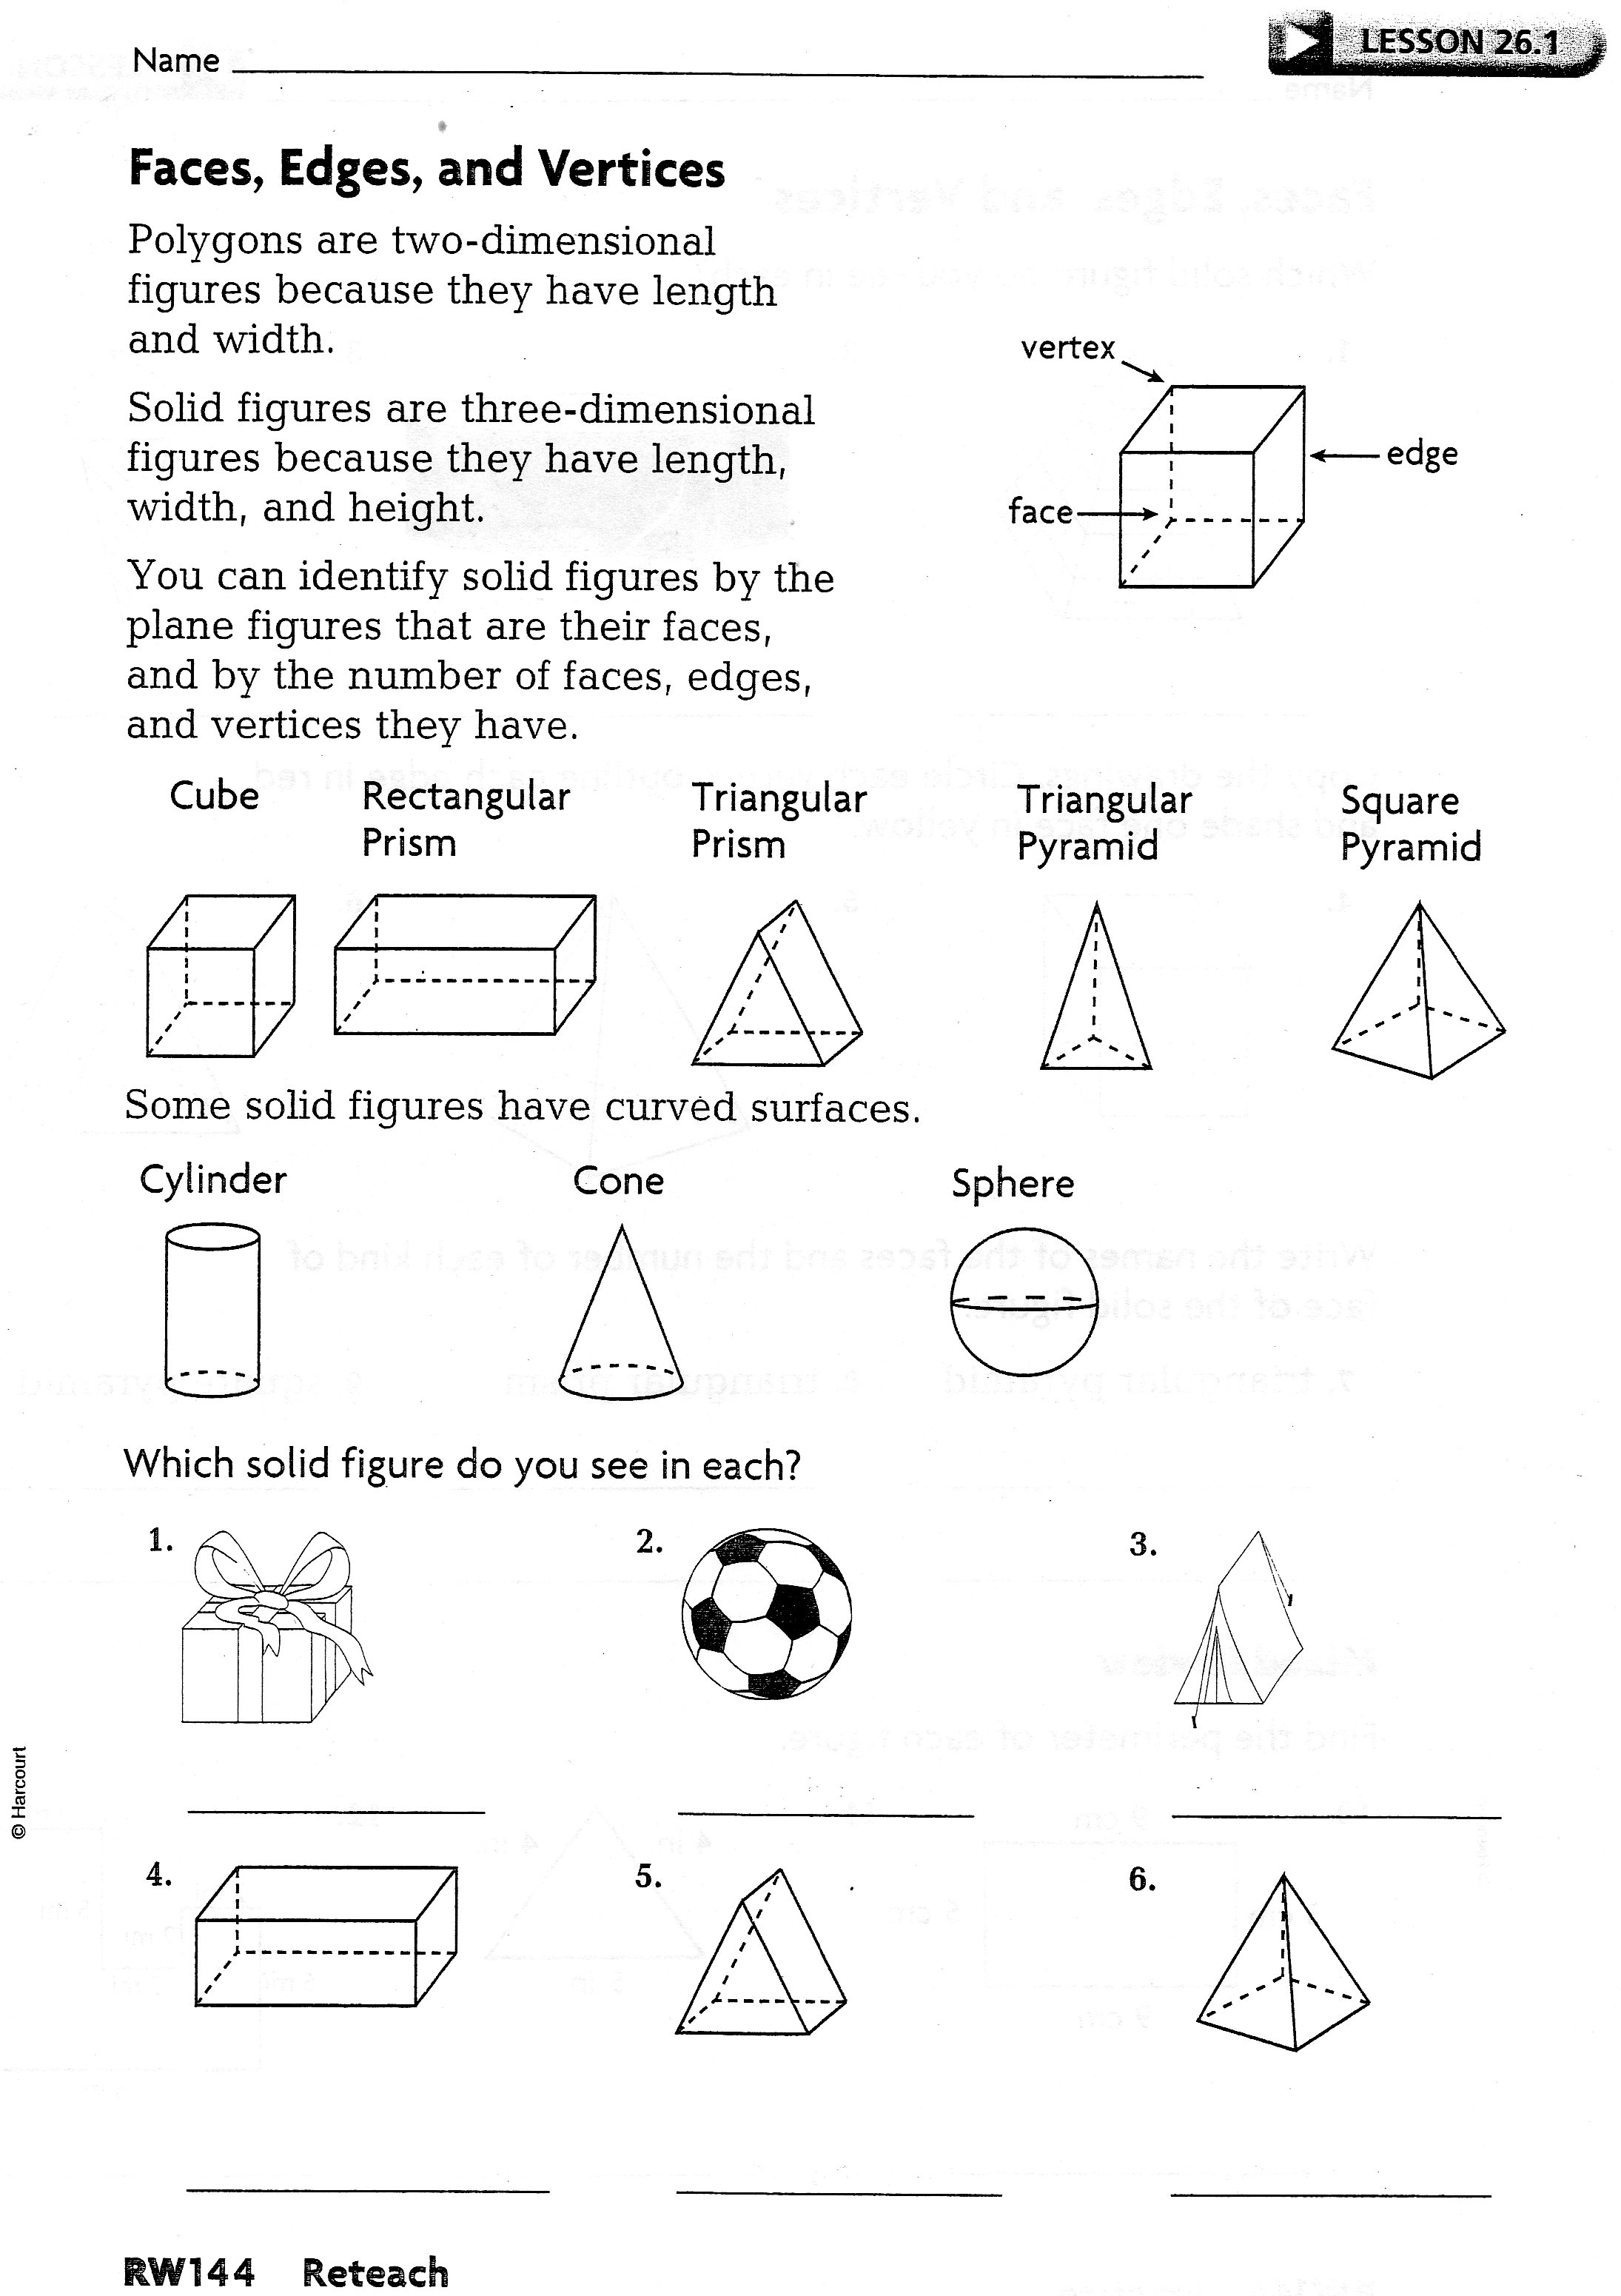
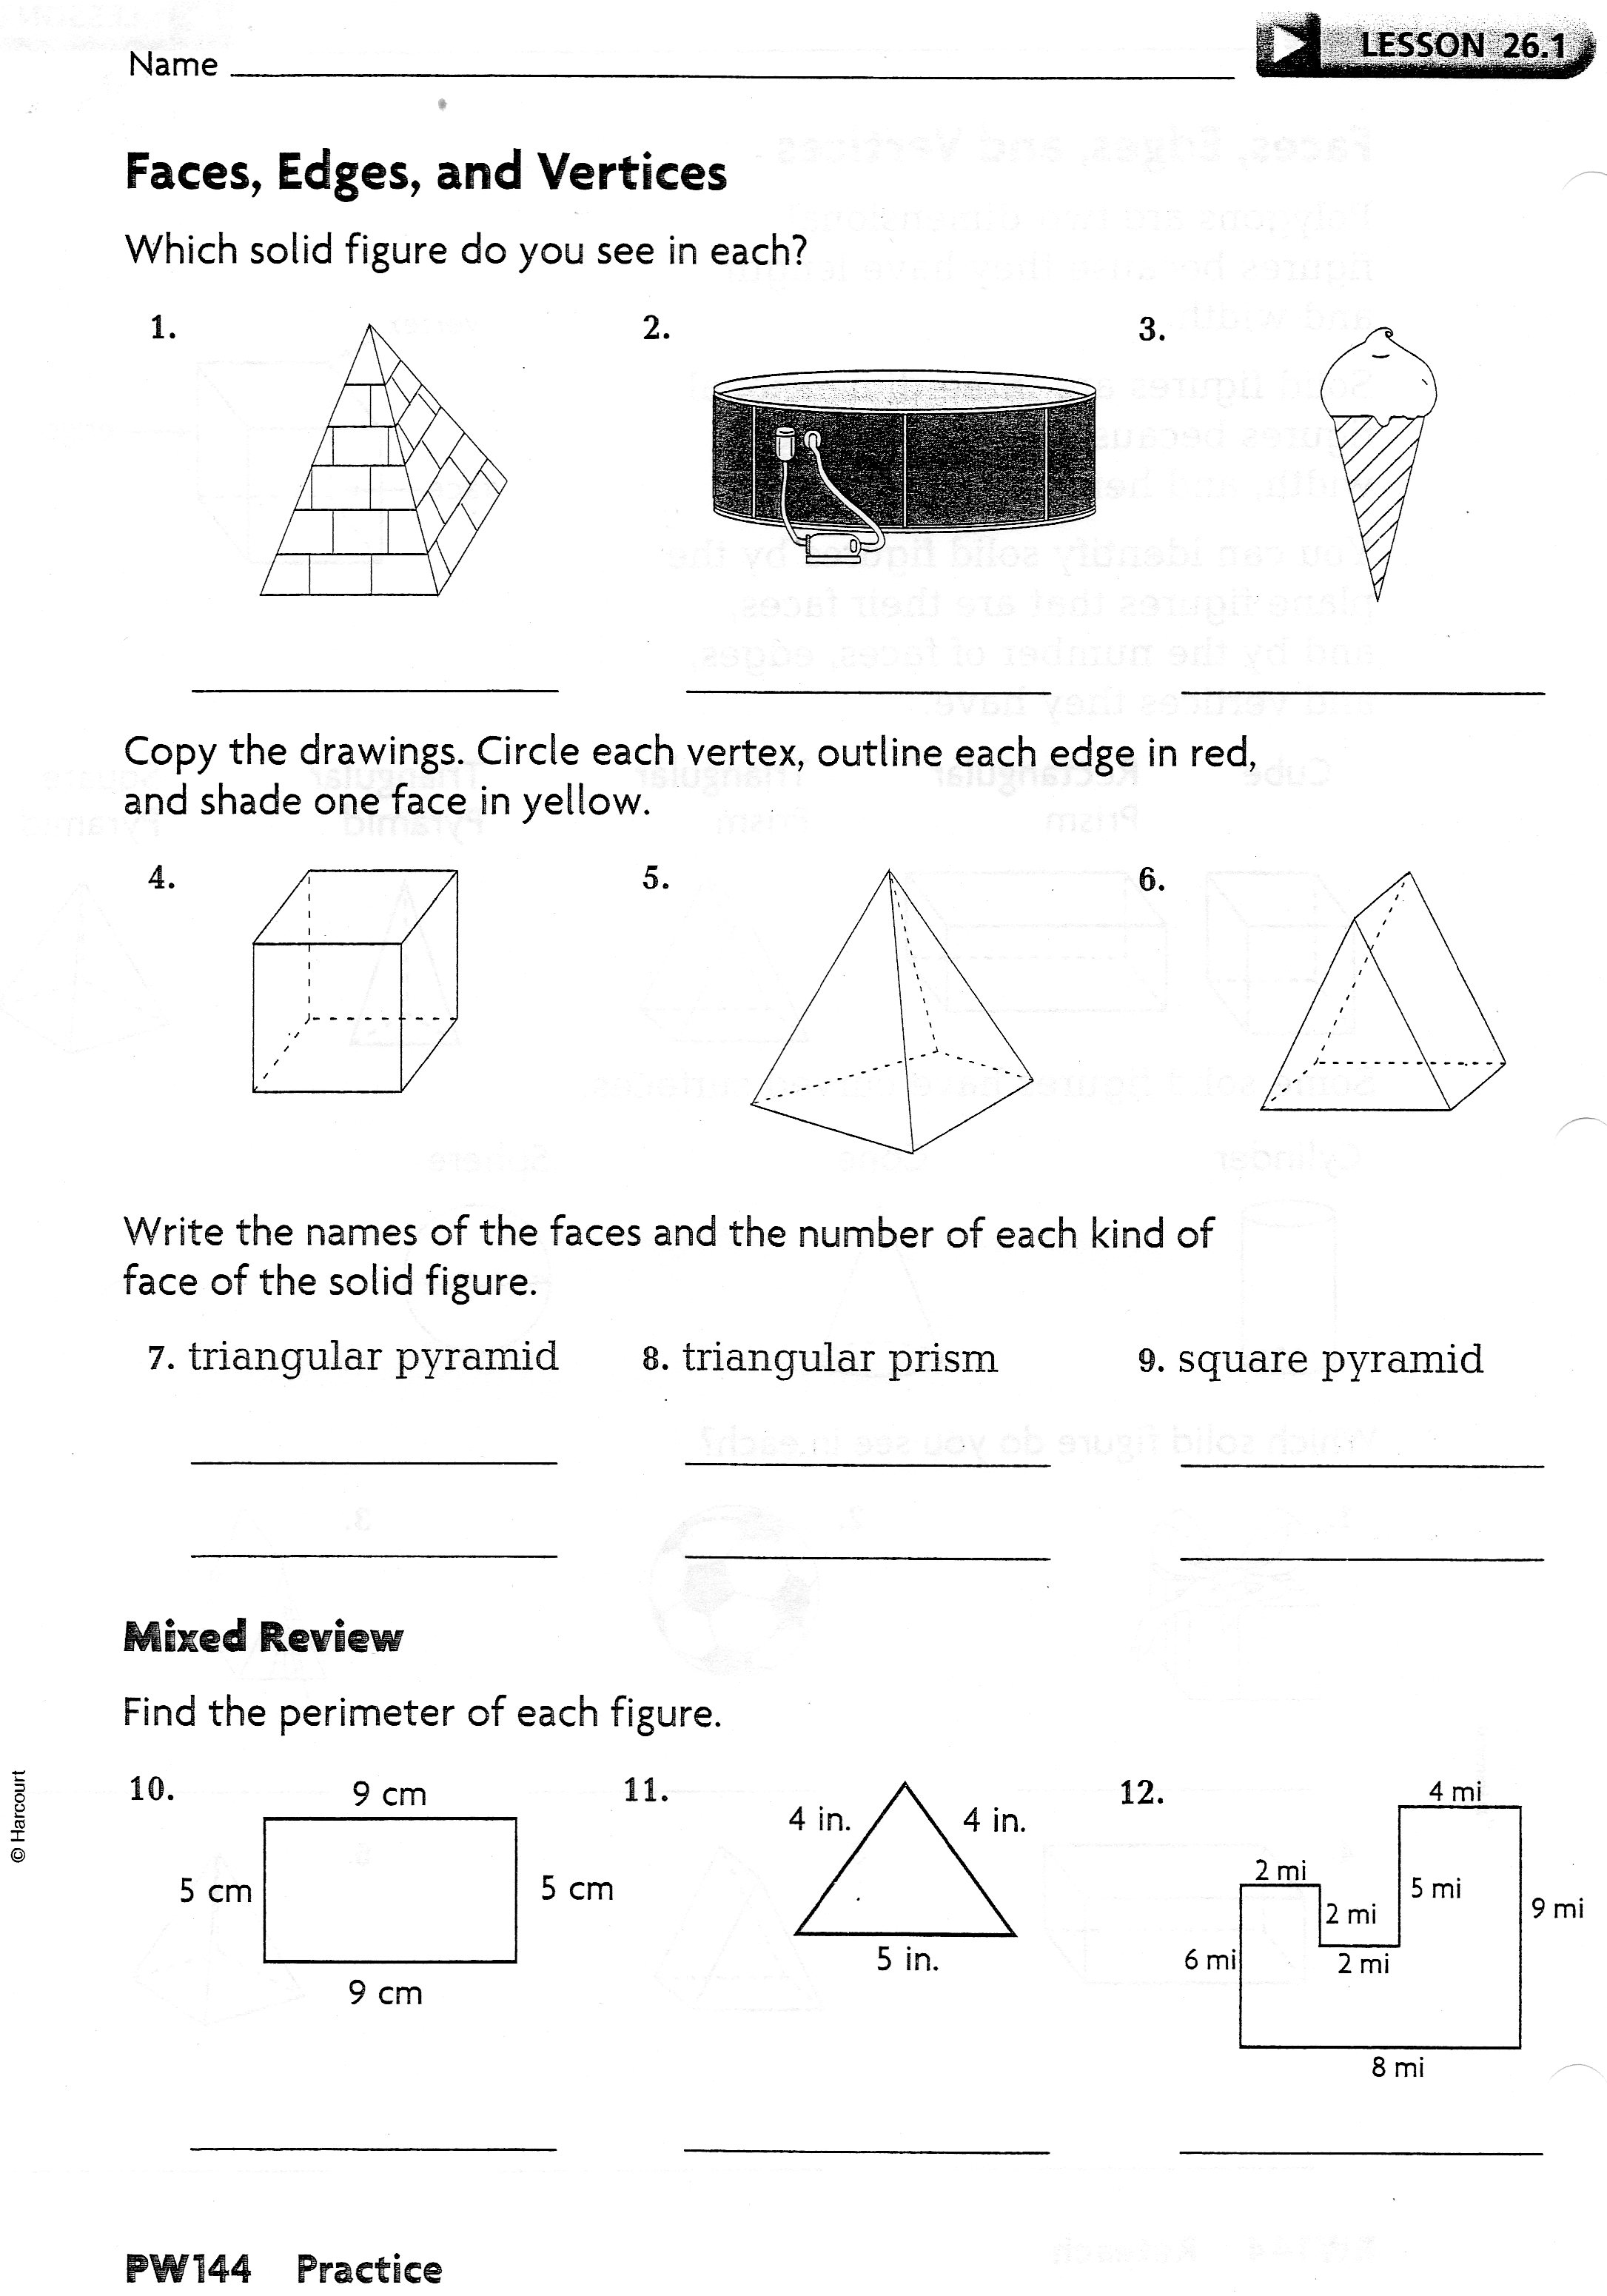
Promethean Board, ActivePen, “Quadrilateral Notes” Worksheet, “Faces, Edges, and Vertices” Flipchart, “Lesson 26.1 Reteach” Worksheet, class set (30) of mobile Netbook computers, www.ixl.com, “Lesson 26.1 Practice” Worksheet |
|
Lesson Plan |
· The teacher will review concepts from the previous lesson by discussing and completing the “Quadrilateral Notes” worksheet with the class (whole group). · The teacher will work through the “Faces, Edges, and Vertices” flipchart with students (whole group), providing definitions and examples of the significant attributes of 3-dimensional figures. This is a concept that students were first introduced to during 3rd grade, so the teacher will conduct a preliminary assessment of student understanding based on student responses to verbal questions. · Students will receive a copy of the “Lesson 26.1 Reteach” worksheet to work on independently. · There will be three computer stations around the room (with 6 netbook computers at each) all connected to www.ixl.com. Center One will be set up on the resource “Identify Planar and Solid Figures”, center two will be set up on the resource “Which 2-Dimensional Shape is being Described?”, and center three will be set up on the resource “Which 3-Dimensional Shape is Being Described?” Students will spend 20 minutes at each center working independently through each resource. During this time, the teacher will monitor discussions and work with individual students to increase understanding. · Students will complete the “Lesson 26.1 Practice” worksheet for homework. |
|
|
Lesson 13.4 Polygons Worksheet.jpg Size : 594.882 Kb Type : jpg |
|
|
Lesson 18.6 Reteach Worksheet.jpg Size : 735.494 Kb Type : jpg |
|
|
Quadrilateral Notes Worksheet.jpg Size : 373.892 Kb Type : jpg |
|
|
Lesson 26.1 Reteach Worksheet.jpg Size : 551.069 Kb Type : jpg |
|
|
Lesson 26.1 Practice Worksheet.jpg Size : 511.401 Kb Type : jpg |
Timeline:
Based on the timing of my unit and the target date of my unit 1 assessment, my plan is to spend no more than six full class days completing my geometry focus. My actual plan lasts for six days, but, should the need arise, there is a possibility of adding one or two more days in order to provide students with additional instruction. Some of the geometry concepts that are covered in this unit are quite complex and I have anticipated needing more than one class period to complete them. However, every group of students is different and what took one day to teach one year, may take two days to teach this year. That being said, I can spend no fewer than 6 days, but no more than 8 days teaching this portion of the unit.
Meeting Diverse Needs:
In order to modify instruction for the diverse learners in my classroom, I provide whole-group instruction both verbally and visually. For many of my lessons, I create flipcharts with visual explanations and examples of every concept being taught. The flipcharts not only provide visuals, but they are also interactive and allow students to manipulate and write objects on the screen. This allows visual, auditory, and kinesthetic learners to engage with the lessons.
Along with whole-group instruction, I frequently meet with small groups of students to discuss and review concepts. Sometimes these groups are created based on data from exit cards or quizzes, and sometimes I pull together heterogeneous students to see them work together and learn from each other. I use these small groups as an assessment tool, as well as further practice for the more complicated concepts.
The use of the computer program IXL Math allows students to practice material in an online setting that they are familiar with. Many of these lessons are designed for students to have independent practice, along with small group instruction and practice with their peers. This allows for students to explore the material independently, or learn from and teach their peers.
In addition to all of these differentiation strategies, I have many students in my math class with IEPs (Individualized Education Plans) and 504 plans (providing accommodations to regular education students with special needs that influence their learning). In order to support these students, I offer such options as extended time on assignments or tests, frequent breaks during stretches of independent work, priority seating in the classroom to ensure that I can closely monitor the students’ behavior or responses, reduce distractions (allowing students to remove themselves from a place where they think they are having difficulty concentrating), and read-to or scribe accommodations. Many of these accommodations are dictated by student IEP or 504 plans, but I find that many of them (including frequent breaks and reduce distractions) can be helpful to all of my students. In addition to providing them the most supportive learning environment, these accommodations also give students the responsibility of making good decisions when it comes to their work and focus.
At this point in time, I do not have any students in my class with physical limitations who need special accommodations.
Preparing the Environment:
The following technological resources will be utilized in order to instruct students in 4th grade geometric concepts:
|
Technology |
Description |
Access Plan |
|
Promethean Board (w/ ActivPen) |
A Promethean Board is an interactive whiteboard connected to one teacher computer through a projector mounted on the ceiling. It comes with additional wireless devices including two ActivPens, one ActivWand, one ActivSlate, and 30 ActiVotes. |
I use the Promethean Board on a daily basis. There is one Promethean Board located in our classroom and one in the computer lab for easy access. Should the Promethean Board in my room not work, my class can move to the computer lab to continue our lesson and use of the computers. |
|
ActivInspire Software Program |
The ActivInspire software program is required for using the Promethean Board effectively. Through use of ActivInspire, teachers can create engaging and interactive flipcharts (similar to PowerPoint presentations) for use on the Promethean Board. |
Every computer in the school (including student computers) comes equipped with ActivInspire, however, only teachers are trained in how to use it. I have taken trainings offered Montgomery County Public Schools on the most advanced uses of ActivInspire. |
|
Netbook computers |
My school recently purchased a class set (30) of mobile Netbook computers. These Netbooks are kept on three storage carts in the Media Center office. They can be signed out by any teacher in the school for use by students. Each Netbook cart has a wireless network router that plugs into Ethernet ports in the classroom. This enables students to log in to their MCPS accounts. |
While the mobile Netbook lab is very convenient, the computers have a very small working memory and take a long time to boot up, therefore, few teachers sign them out. I will need to plan for the days I need them, and sign them out in advance to prevent scheduling conflicts. Once the Netbooks are in the classroom and passed out to students, all they need are their MCPS usernames and passwords to sign in. |
|
IXL Math (www.ixl.com) |
IXL Math is a website that is accessible to the general public that provides access to math resources for grades Pre-K through 8th. Students can choose areas of practice by topic or by grade level. |
My school has purchased a site license to IXL Math which enables students to access the program right from their school desktop. This makes it very easy to log in to their MCPS accounts and access the program. |
Logistical Plan:
I pride myself in my technology skills as well as my ability to troubleshoot issues with technology. These skills have served me very well in the past, but should an error come up when working with any of the above technology, there is a chain of command that I can reach out to. After I have exhausted all of my resources and knowledge, the Media Specialist is willing to offer any support that she can. She is specially trained in all of the technology that we have at our school and is an invaluable resource when something goes wrong.
Should a problem arise that the Media Specialist is unable to solve, there is an MCPS Technology Specialist who services our school. Our IT specialist is only in the building once a week, however, so if a problem like this were to occur with my necessary technology, it is always important to have a backup plan. My plan will be to move my class to the computer lab and continue the lesson until our IT specialist is able to fix my problem.
It is also important for me to consider that my students will most likely have varying technology skills. While many of my students own and work with computers at home, the level at which they use this technology is always different. Before allowing students to work with the technology, I will need to take time to demonstrate how the program works as well as how students can gain access to it. Even after this demonstration, I will most likely need to guide students through this process for the first few days of using the program.
In addition, there are frequently days where students are absent from school. This presents a problem because of the limited amount of time that we have to spend using this program and learning about this topic. This is the main reason that I chose a technology program that is available publicly. Should a student be absent during one of the classes where we are learning new material or working with IXL Math, I plan on contacting their parents and requesting that the child spend time using the program at home. Understandably, if a student is very ill, this may not be a feasible option, however. In that case, I will arrange for this student to have a “lunch bunch” group with me. This is a program that I offer with students in which they are allowed to pick up to three friends from our class to come and spend lunch with me. During this time, we work on the material that was covered during the time the students was absent. The friends that were invited along serve as additional resources and teachers for the absent student.
Should any other issues arise during instruction, I will do my best to handle them using the above plans and my teaching skills.